The Klemheist Knot is a “friction hitch” or a “slide and grip” type of knot. It provides a secure grip on another rope when it’s loaded from the bottom, and you can freely move it without a load.
In other sources, it’s also sometimes referred to as the Machard Knot, the French Machard Knot, or the Klemheist Friction Hitch.
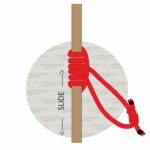
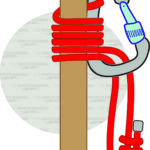
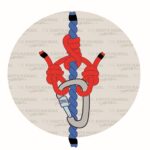
Quick Guide: How to Tie a Klemheist Knot
To tie the Klemheist Knot, you need to get a fixed loop made from rope, cord, or webbing first. You can tie it using a Water Knot or a Double Fisherman’s Knot. It should be 1/2 or smaller in diameter than the rope or pole that you’ll be attaching it to.
It’s tied similarly to the Prusik Knot, only both loops are intertwined at the end. Start by wrapping the sling around the static rope two or three times from the bottom and going upwards. Then you need to take the bottom bight and loop it through the upper one to finish the knot.
For better grip, you should always keep the knot of the fixed loop at the bottom of the Klemheist Knot. This ensures that it doesn’t weaken the strength of the knot.
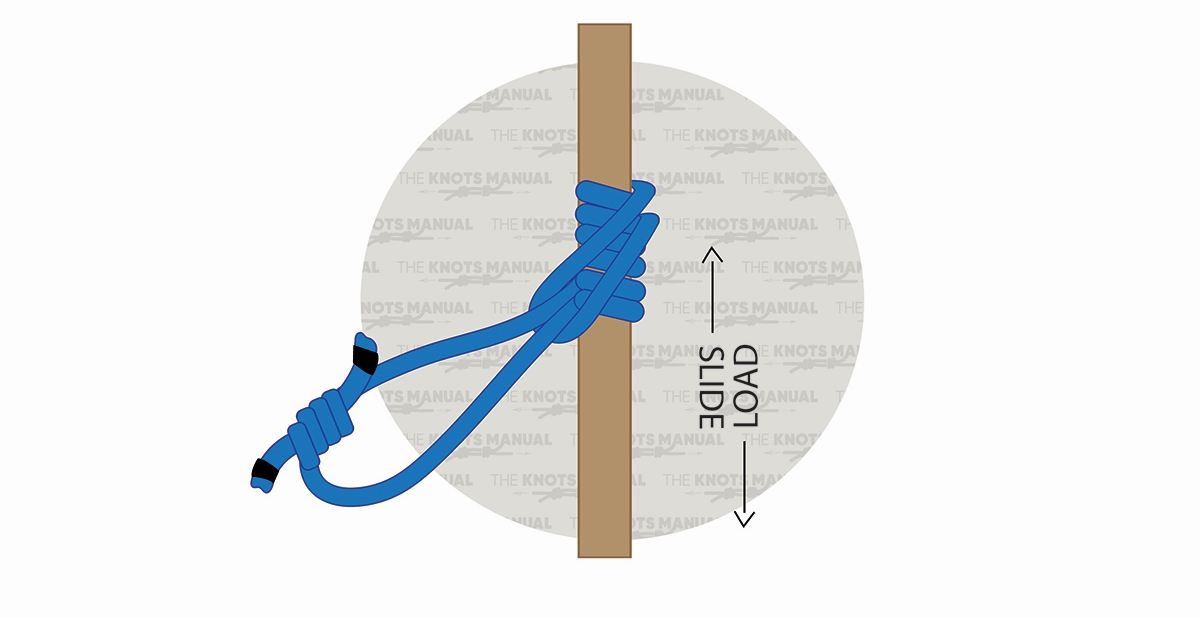
Before using the Klemheist Knot, always test its strength. You can only load it from the bottom direction – if you’d load it from the upper side, it wouldn’t provide strong enough friction and would slide. If it keeps sliding once loaded, you can increase the number of turns around the rope.
Pros and Cons of the Klemheist Knot
The Klemheist Knot is often used because it’s very easy to slide when it isn’t loaded with weight. You can slide it with your free hand without much effort.
Another advantage is that it can also be used with webbing and cord, not only rope. If you wrap the webbing without any overlapping, it will provide a strong enough grip.
The Klemheist Knot is also very easy to tie and untie. It doesn’t jam, and even a beginner can easily remember how to tie this knot.
If used with a rope that’s about 1/2 in diameter or smaller than the rope that you’re attaching it to, it provides a very strong grip, which improves as you load it with more weight. But if you use it with ropes that are similar in size, it won’t provide a secure enough grip and is very likely to slip.
Its main downside is that the weight can be applied only from the bottom direction. Once you load it from the other direction, it’s very likely to slip. A Prusik Knot is preferred in this case.
Common Uses for the Klemheist Knot
The Klemheist Knot is most commonly used in climbing, mountaineering, search and rescue, and caving. It’s used for ascending and descending a fixed rope on steep cliffs. In this situation, a Prusik Knot is also a good choice, but the Klemheist Knot is much easier to adjust and slide, while still providing a strong enough grip. It’s also often used for repelling or to quickly secure yourself to a vertical rope.
Knots Like the Klemheist Knot
Hedden Hitch: It’s almost identical to the Klemheist Knot, except it’s wrapped around the static rope from top to bottom, not the other way. That’s why it’s sometimes also called the “Upwards Klemheist Knot”. It’s supposedly more secure than the Klemheist Knot.
Autoblock Knot: This friction hitch is also very similar to the Klemheist Knot. The only difference is that instead of looping both ends through one another (steps 4-6), they’re joined with a carabiner. This makes it possible to untie while the load is still applied.
Bachmann Knot: This is another friction hitch, only it uses a carabiner in its structure. It also provides a very strong grip while being easy to slide once load isn’t applied.
Prusik Knot: This is the most commonly used friction hitch. It’s tied the same way as the Klemheist knot, only symmetrically, starting from the center. It provides a stronger grip that can be loaded from both sides but it’s harder to slide when no weight is applied.
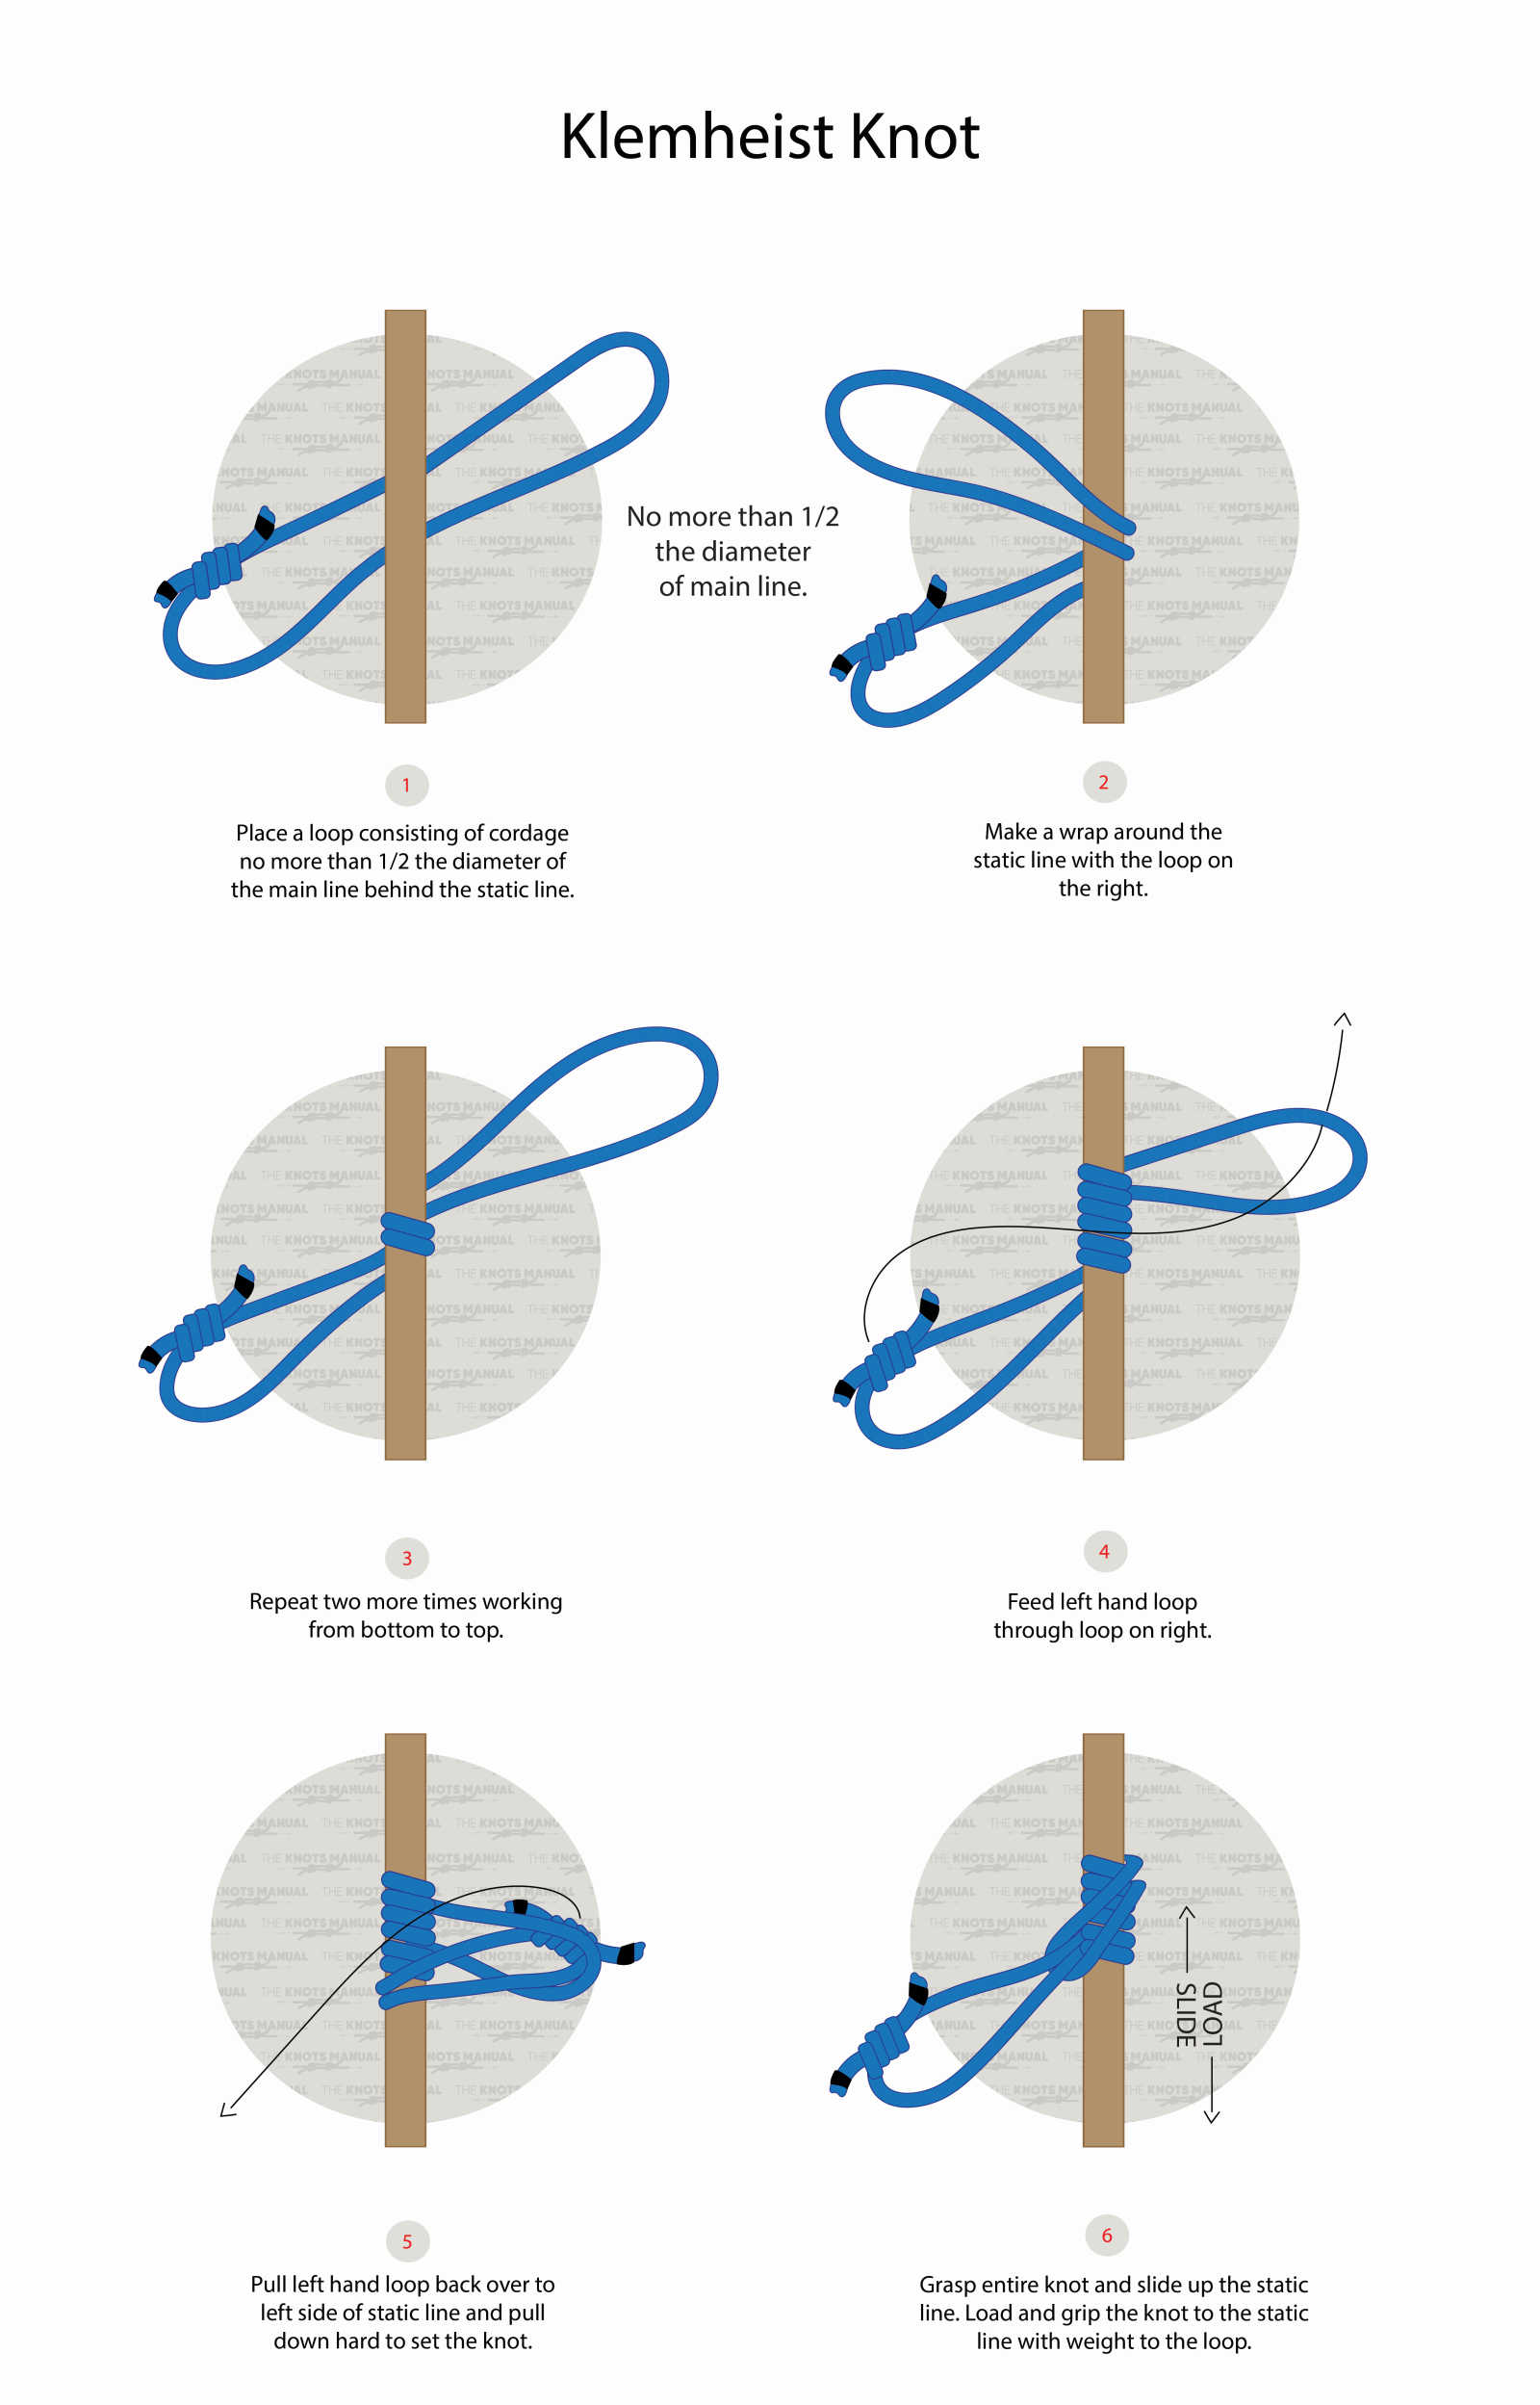
How to Tie a Klemheist Knot: Step-By-Step Guide
A step-by-step guide on how to tie a Klemheist Knot.
Step 1:
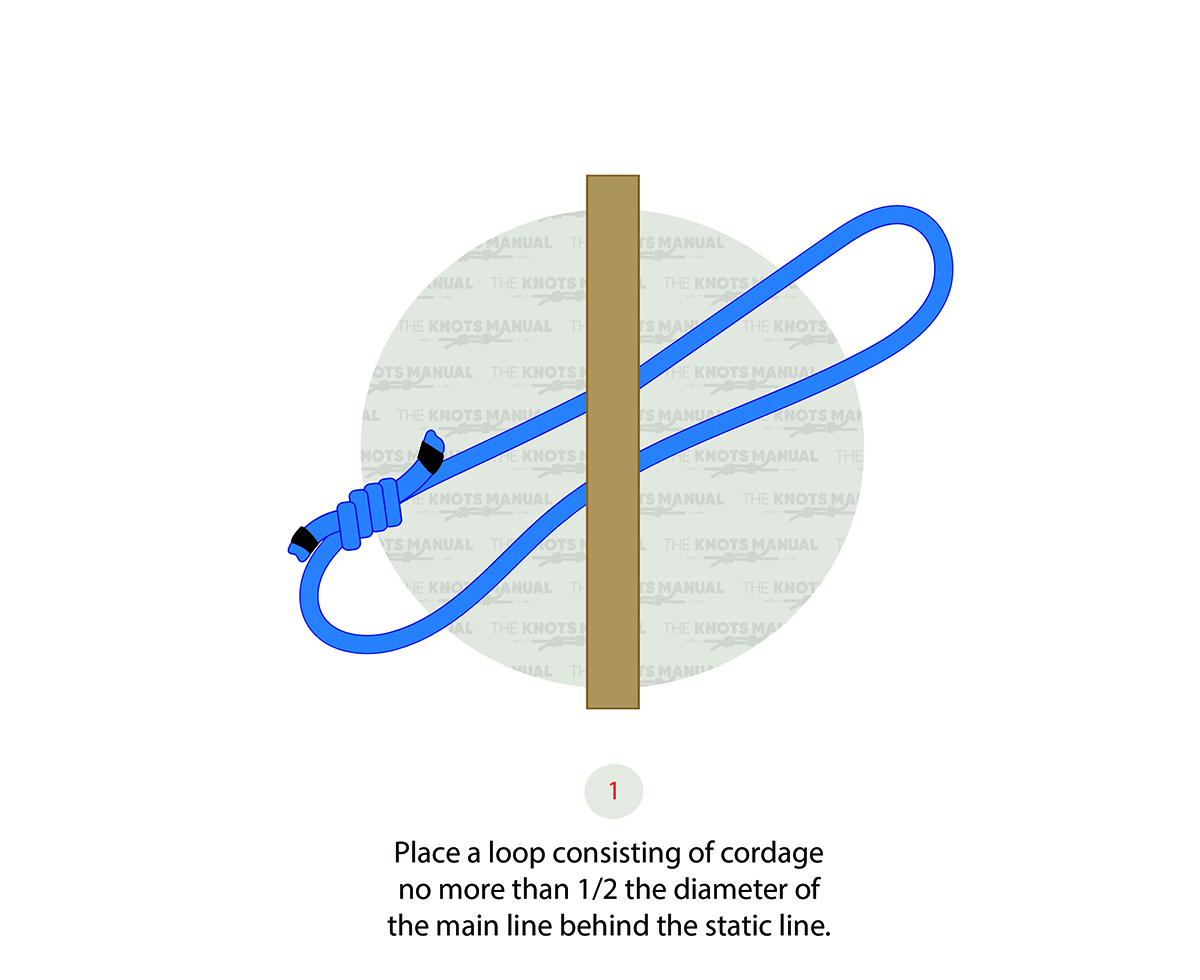
Place a fixed loop right next to a pole or another larger rope.
Step 2:
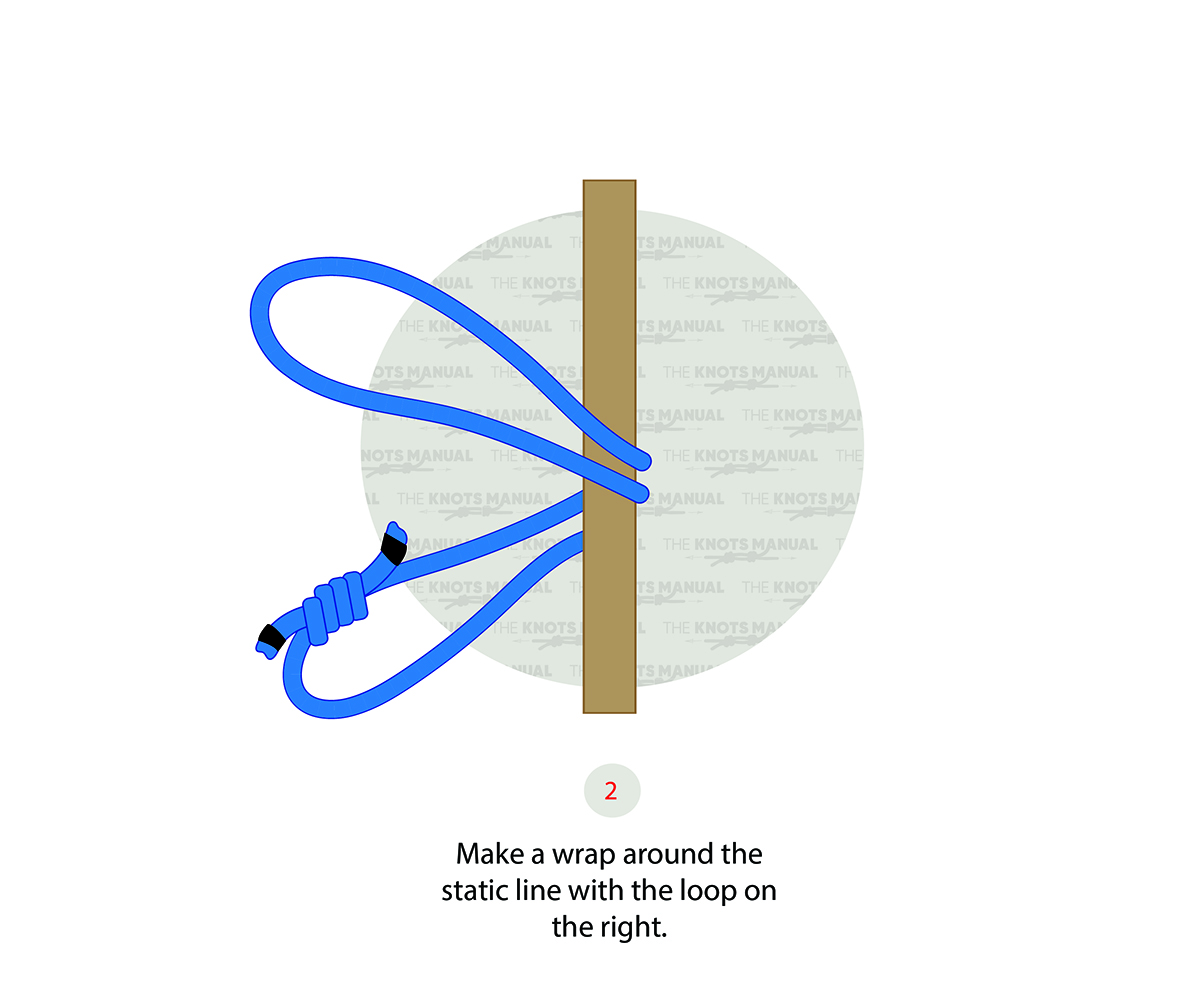
Wrap it around the main rope/pole starting from the bottom upwards.
Step 3:
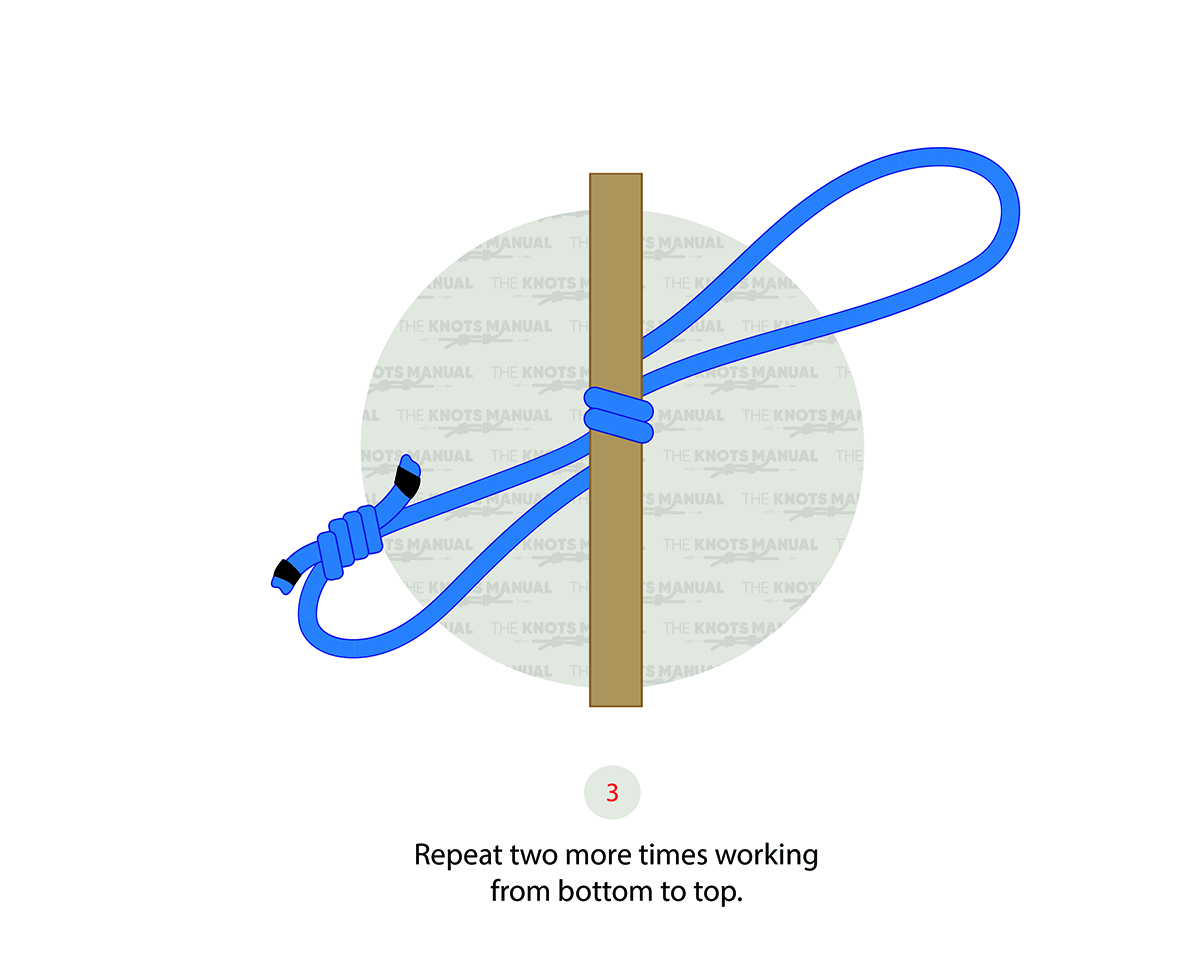
Wrap it around the pole/rope and then do another 2-3 turns.
Step 4:
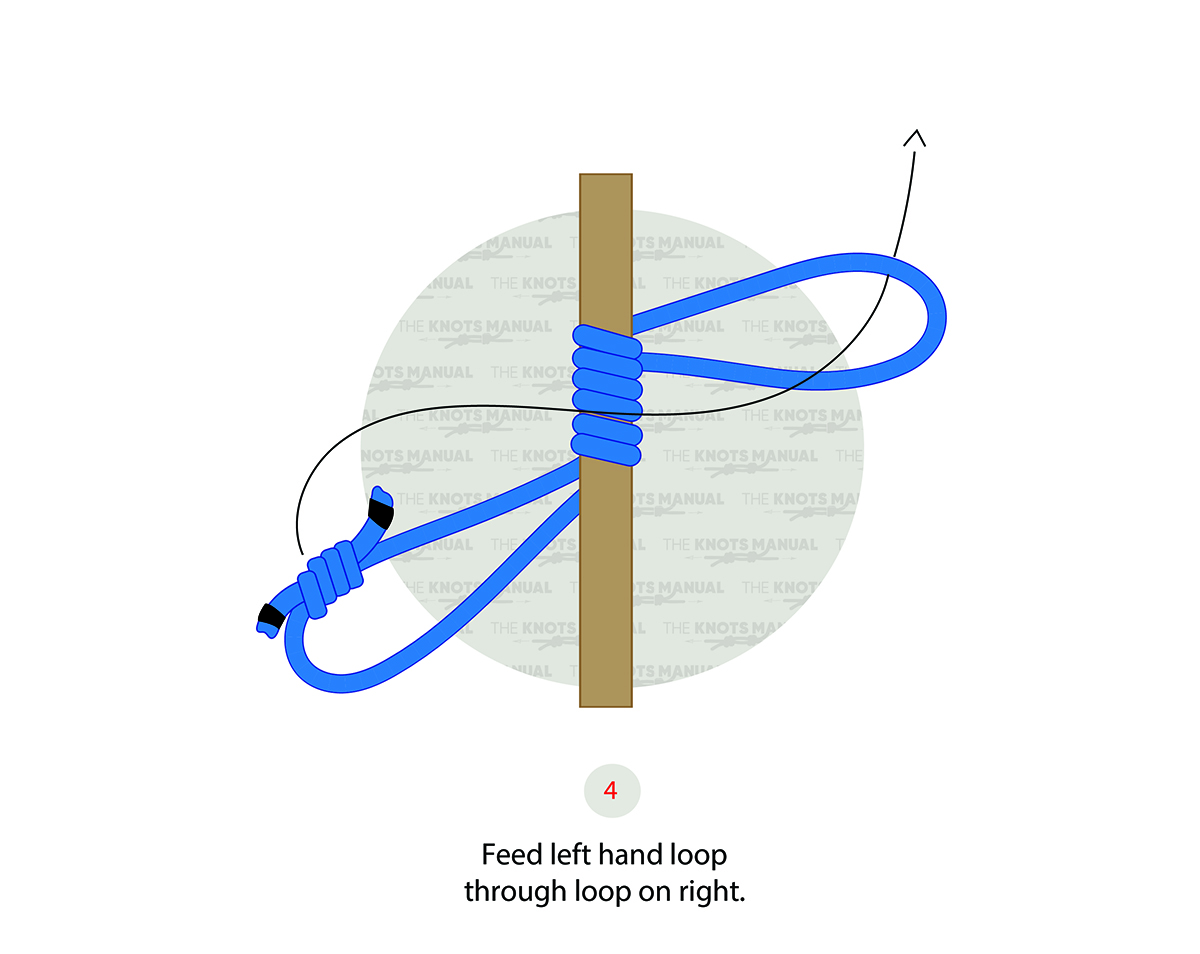
Pass the bottom part of the fixed loop (with the knot) through the upper one.
Step 5:
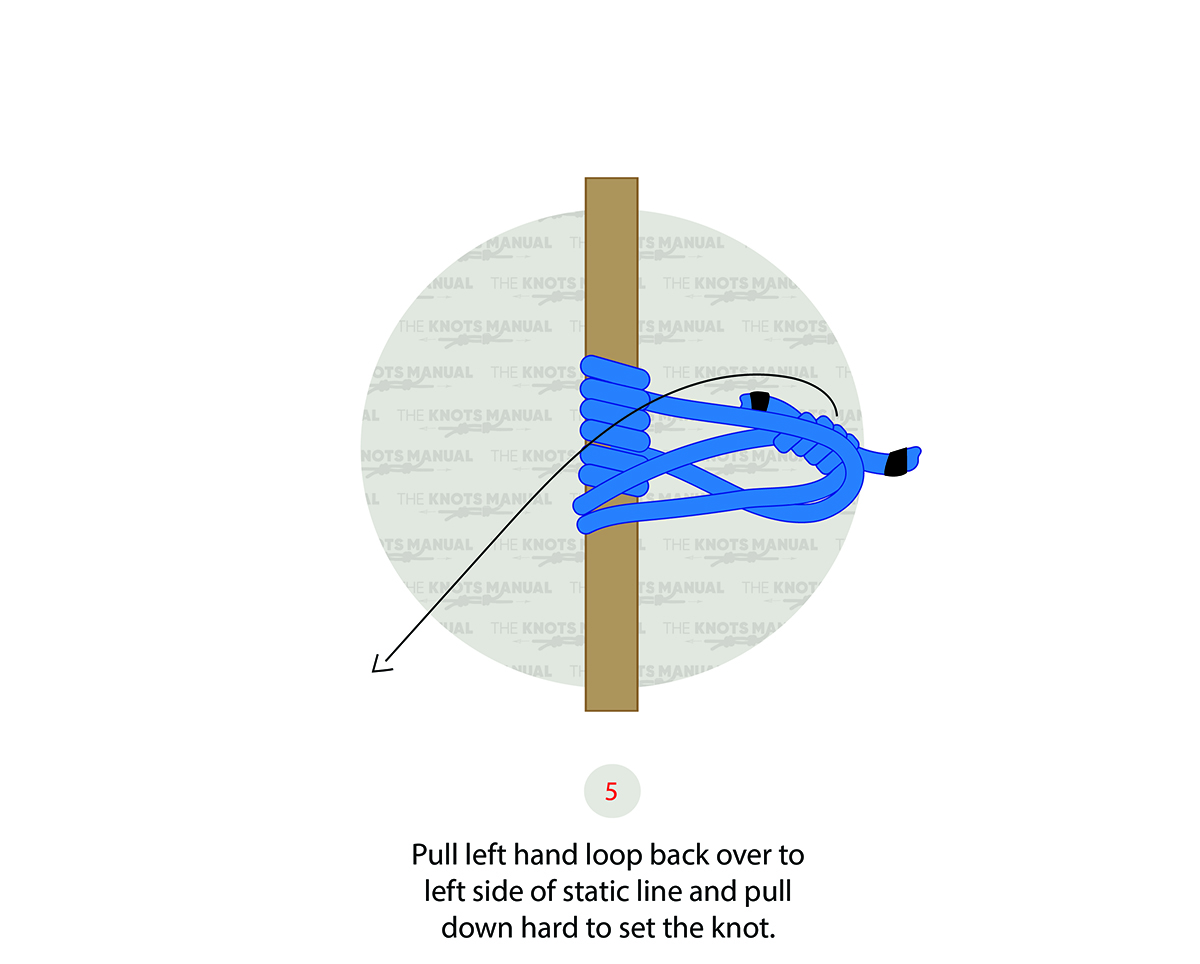
Take the bottom loop back down to finish the Klemheist Friction Knot.
Step 6:
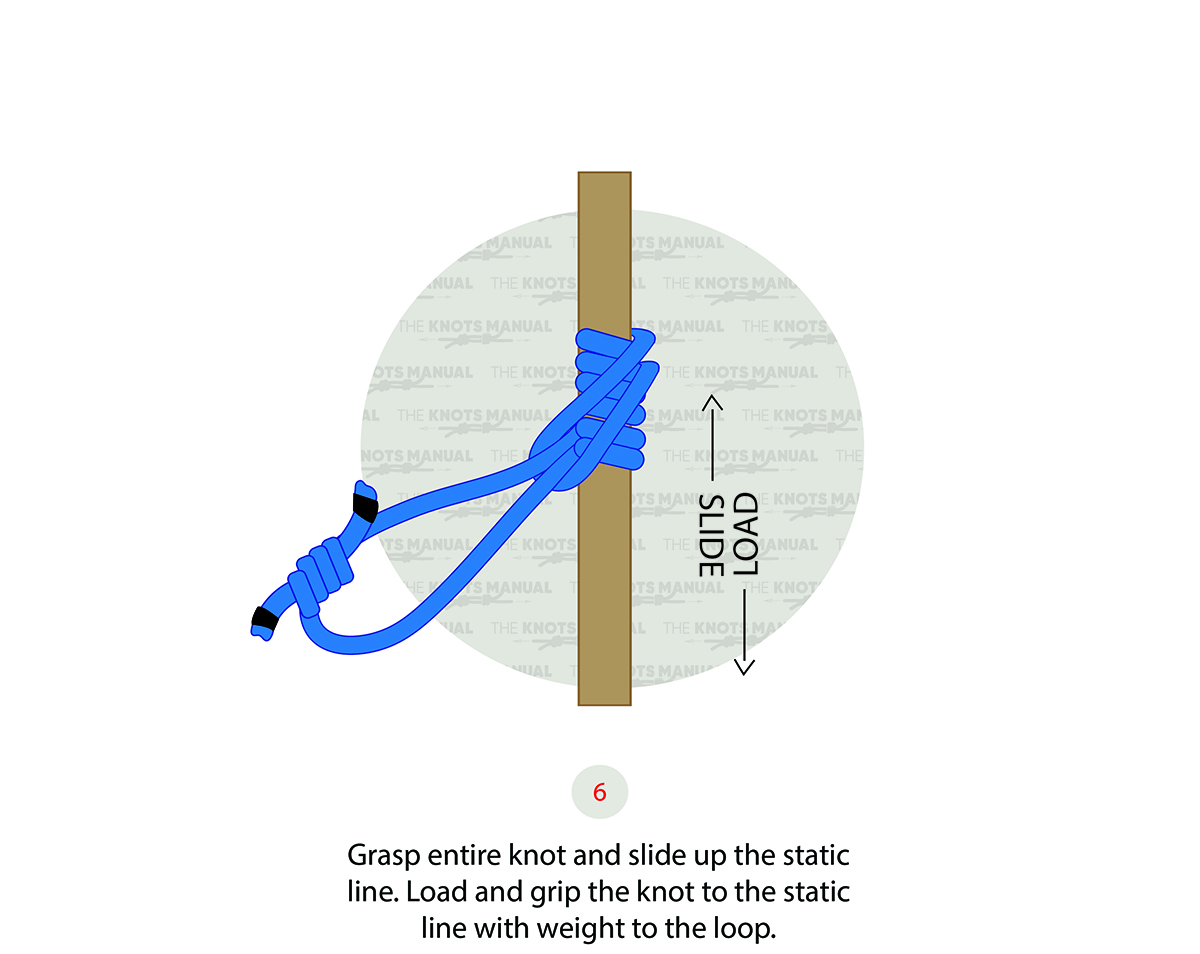
Attach the load only from the bottom direction to keep the knot from sliding down. You can adjust it once the load has been taken off.
Frequently Asked Questions
How Does the Klemheist Knot Compare to Prusik Knot?
The Prusik Knot is tried differently from the Klemheist Knot – starting from the center and going outwards with each turn. It can be loaded from both sides, not only the bottom. It also provides a stronger grip, which is why it’s more popular than the Klemheist Knot. But if used correctly, the Klemheist Knot is better in some situations because it’s much easier to slide when no weight is applied. If you need to move quickly up a rope, then the Klemheist Knot is the preferred choice over a Prusik Knot.
Is the Klemheist Knot Safe Enough for Climbing?
The Klemheist Knot is safe enough to use for climbing to use as a backup for repelling and in other similar applications. It provides almost as strong of a grip as the Prusik Knot. Its only downside is that it can only be used with a rope that’s about 1/2 in diameter of the vertical rope. But before using it, always test it first to ensure that it has a strong enough grip and increase the number of turns if needed.