The Figure 8 Bend Knot creates a strong connection between the ends of two ropes. It’s one of the strongest knots for tieing two ropes together, so you can use it for important applications, like climbing or rescue.
Sometimes, this knot may also be referred to as the “Flemish Bend”, “Rewoven Figure of Eight Knot”, “Retraced Figure 8 Bend”, or the “Double Figure 8 Bend”.
Quick Guide: How to Tie a Figure 8 Bend Knot
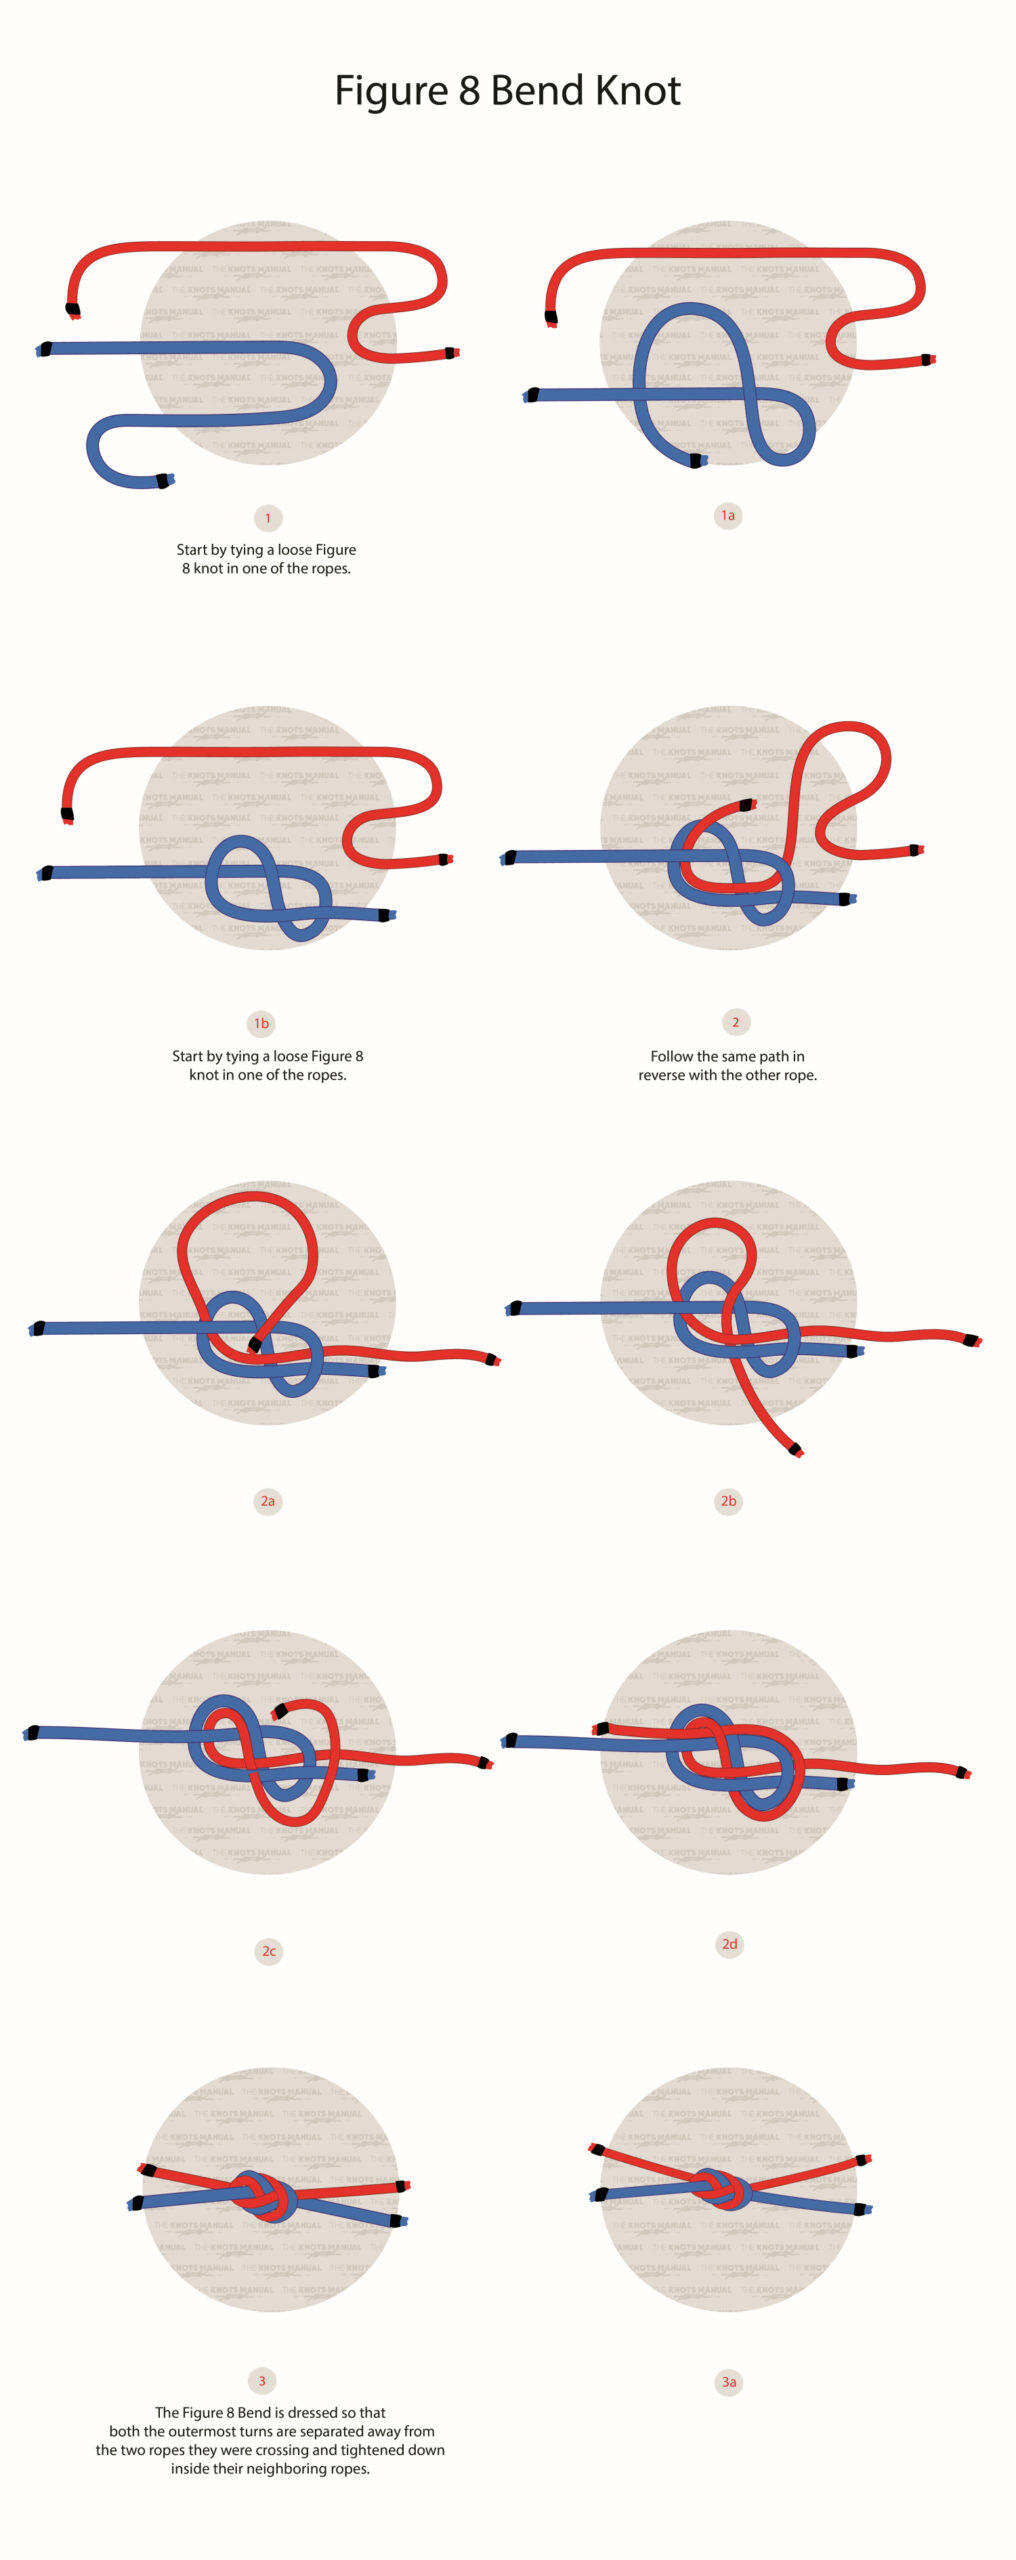
The Figure 8 Bend Knot stems from the regular Figure 8 Knot. You can tie it by tying a Figure 8 Knot on one rope and then retracing it the opposite way with the other one.
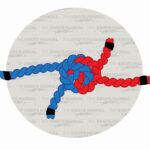
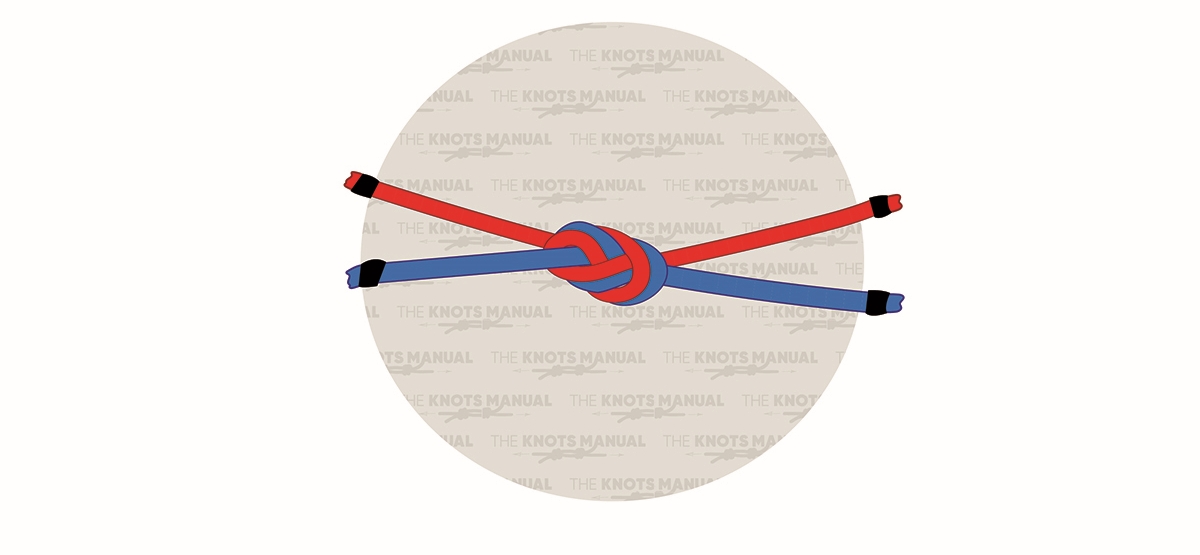
To finish the knot, pull both standing ends of the rope in opposite directions. To check that the knot is tied correctly, make sure that it consists of three sets of parallel ropes.
The Figure 8 Bend is tied almost identically to the Figure 8 Follow Through. The only difference is that instead of tying the working end of the rope around an anchor and then retracing it, the other rope is retraced.
This knot tightens by itself under load, so no stopper knots are needed. But when used in life-threatening applications (for example, climbing) you should tie a double overhand stopper knot on each side. This acts as a backup in case you tied the knot incorrectly or if it wasn’t dressed correctly.
Don’t use this knot for tieing together two ropes with different diameters. If the diameter difference is too large, the smaller rope could slip through the knot because the larger rope won’t bend tight enough to hold it in place. You can only use this knot for tieing two ropes of similar sizes.
Pros and Cons of the Figure 8 Bend
The Flemish Bend is the go-to choice for most people when they need to create a safe connection between two ropes. That’s because it’s one of the strongest bend knots out there.
The Figure 8 Bend is also easy to tie and check – it should form three sets of parallel ropes. That’s why this knot is often taught to beginners.
Its main downside is that it can’t be used with ropes of different diameters. Otherwise, there’s a risk of one rope slipping out of this knot.
Another downside is that under extreme loads, this knot has a tendency to jam and become hard to untie.
Where the Figure 8 Bend Knot Is Commonly Used
The Figure 8 Bend Knot is used whenever you need to connect two ropes together of similar sizes. Most commonly, this is done in search and rescue, climbing, caving, and in DIY applications when you’re working with short ropes.
But in climbing and caving, this knot isn’t the preferred choice. That’s because it’s somewhat bulky, which means that it can get stuck between rocks.
Knots Like the Figure 8 Bend
Fisherman’s Knot: As the name suggests, it’s most commonly used in fishing. But it’s also used in similar applications, where you need to connect two ropes. It’s easier to tie than the Flemish Bend, but it isn’t as strong. It consists of two overhand knots tied in opposite directions.
Flat Overhand Bend: This is the simplest knot for connecting two ropes together, but also the least strong one. It’s an overhand knot but tied with two ropes instead of one. That said, this knot is very commonly used in climbing because it almost never gets stuck between rocks.
Double Fisherman’s Bend: This knot also creates a connection between two ropes. It’s often used in fishing, but it’s also very popular among climbers. It creates a connection stronger than the Figure 8 Bend, but it’s much harder to untie.
Square Knot: This is one of the simplest ways of connecting two ropes. But it should only be used for non-life-threatening situations because the connection isn’t very strong.
Zeppelin Bend Knot: This is a less-popular knot for tieing two ropes together. It also creates a very strong connection. This knot is often sometimes used by arborists, boaters, and survivalists.
Nail Knot: This knot creates a very strong and slim connection between two ropes. It’s often used when the connection needs to be permanent because it’s difficult to tie and very difficult to untie.
Detailed Step-By-Step Guide: Flemish Bend Knot
How to tie a Figure 8 Bend Knot, other called the Flemish Bend.
Step 1:
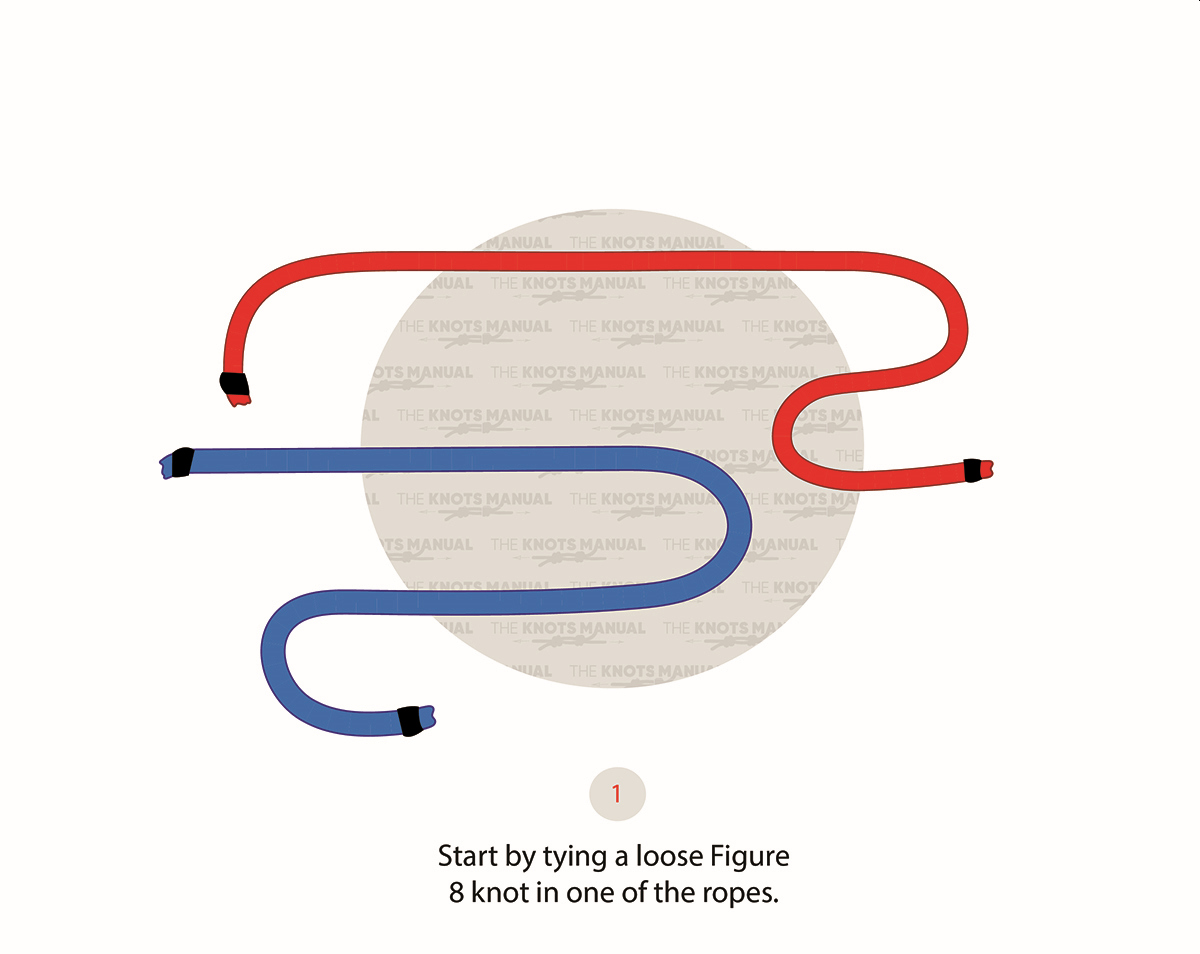
Make an open bend with the working end of one of the ropes.
Step 1a:
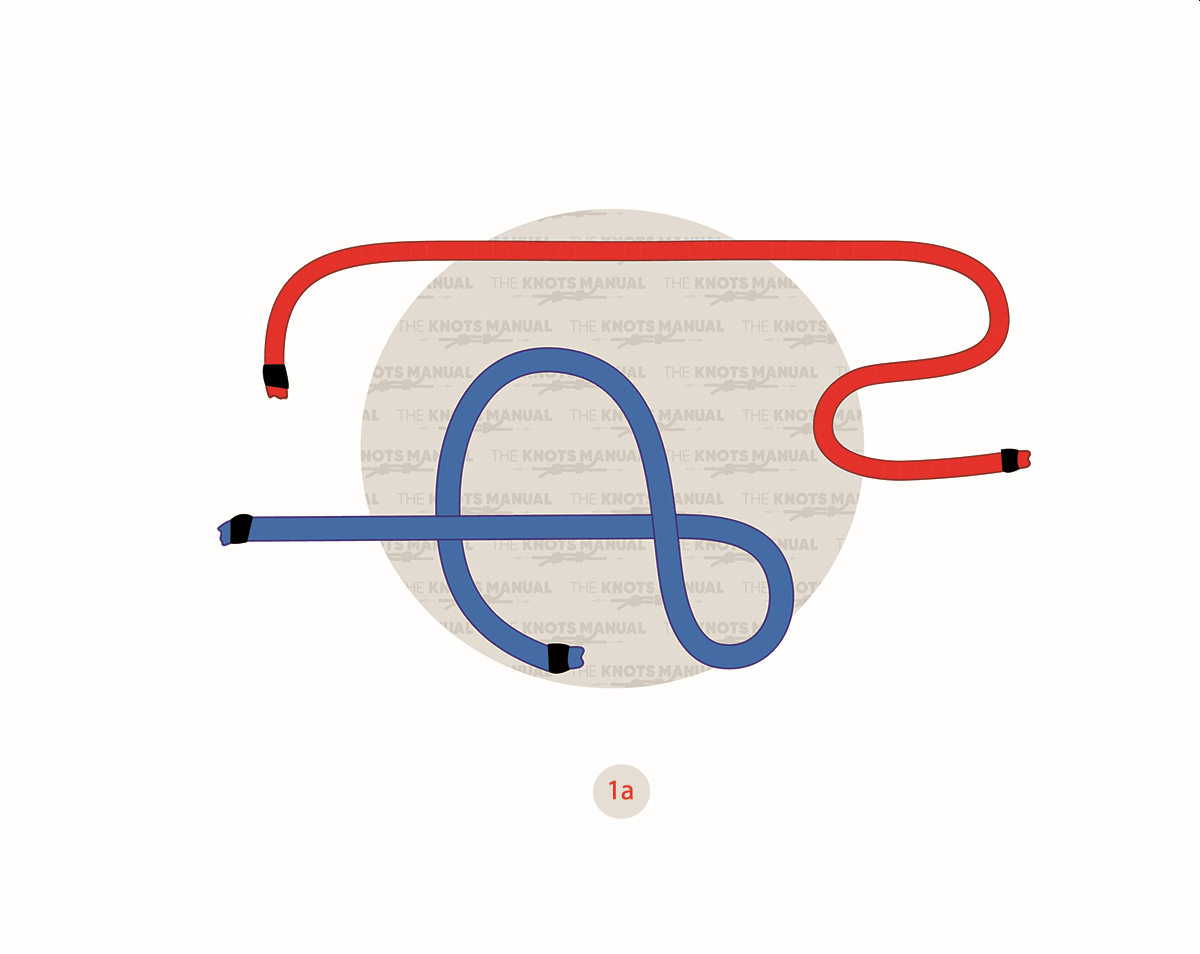
With the end of the rope, go over, under, and again over the rest of the rope.
Step 1b:
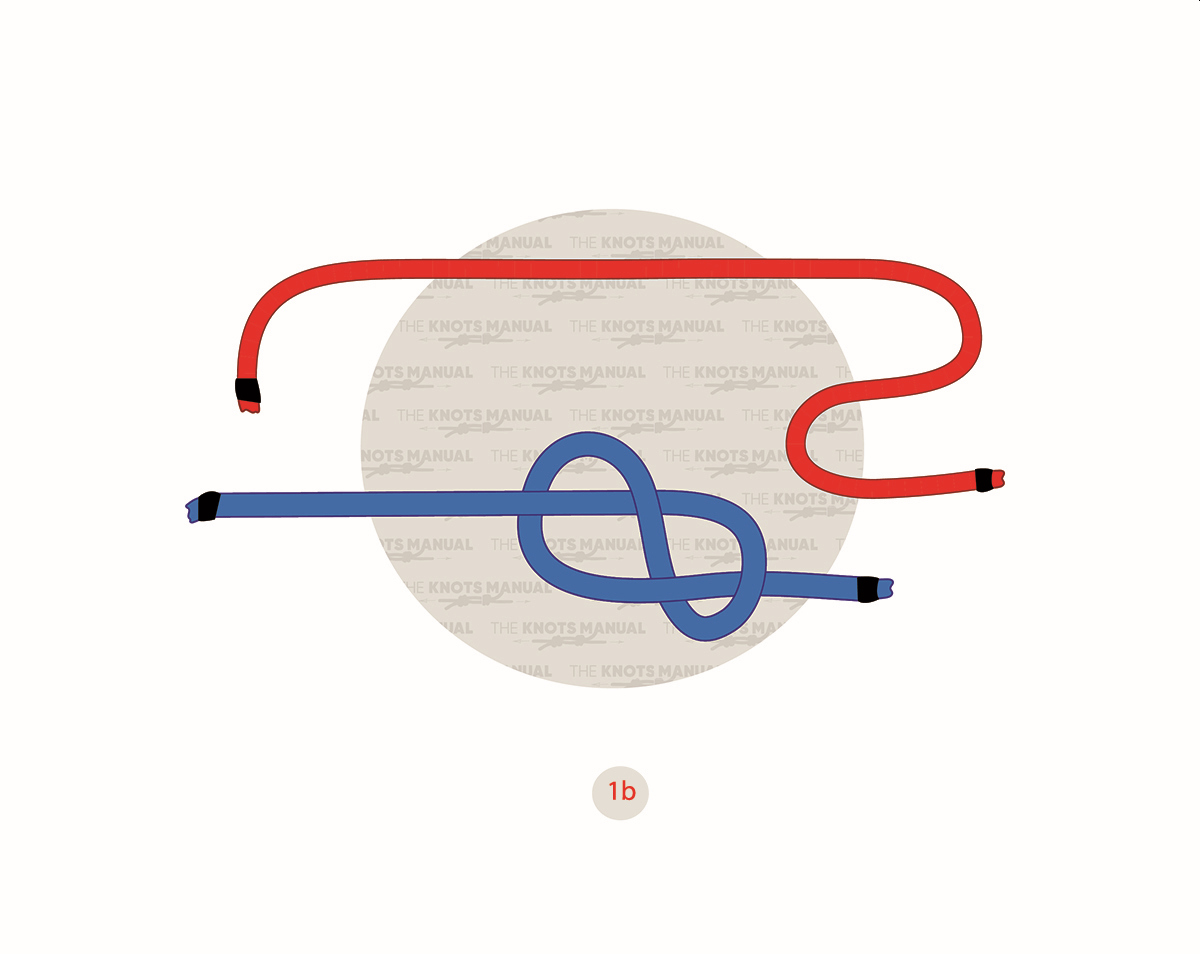
Go through the last loop with the working end, forming a loose Figure 8 Knot.
Step 2:
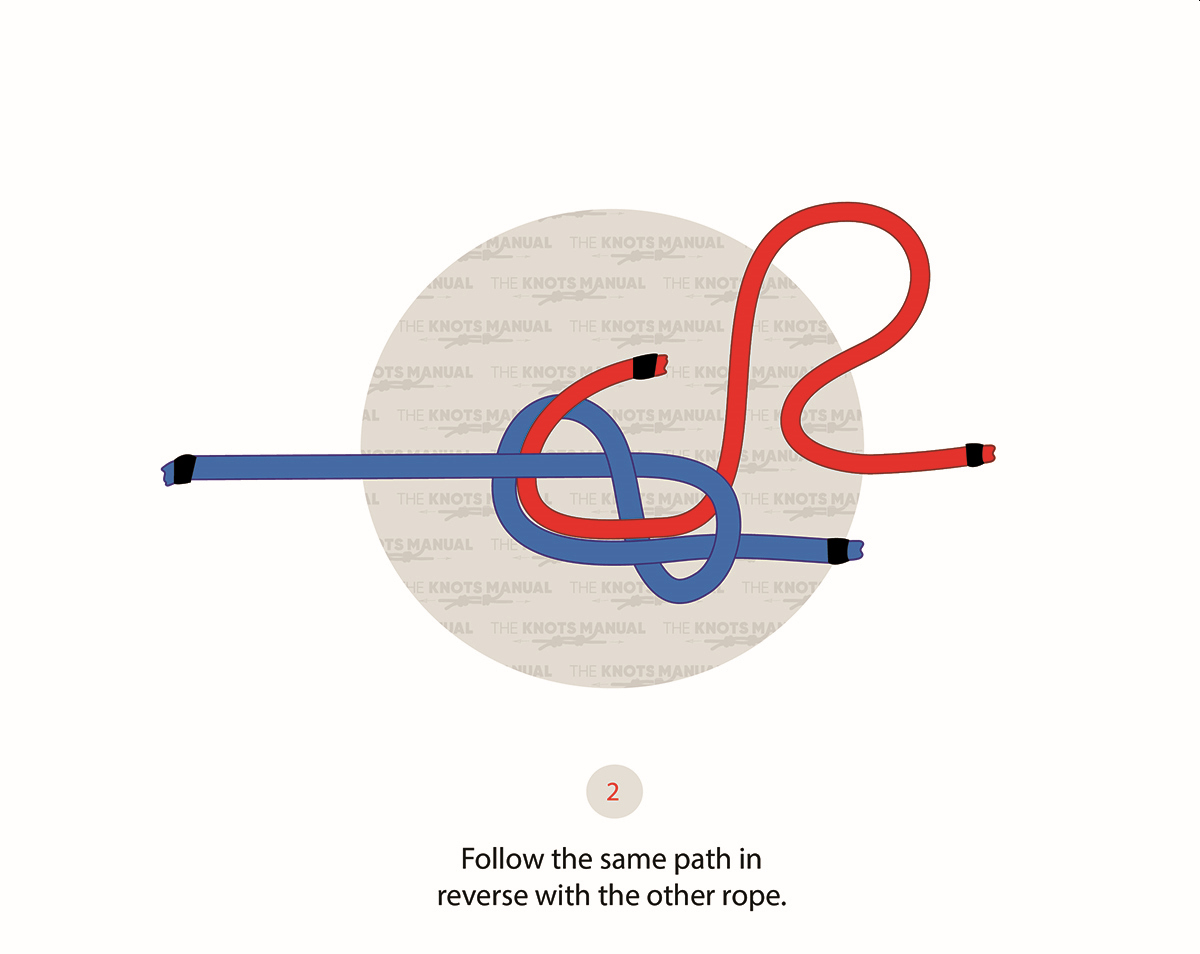
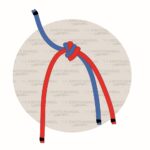
Take the end of the second rope, and start retracing the knot that you made with the first rope, only from the other direction. Start by going through the last loop that you made in step 1b.
Step 2a:
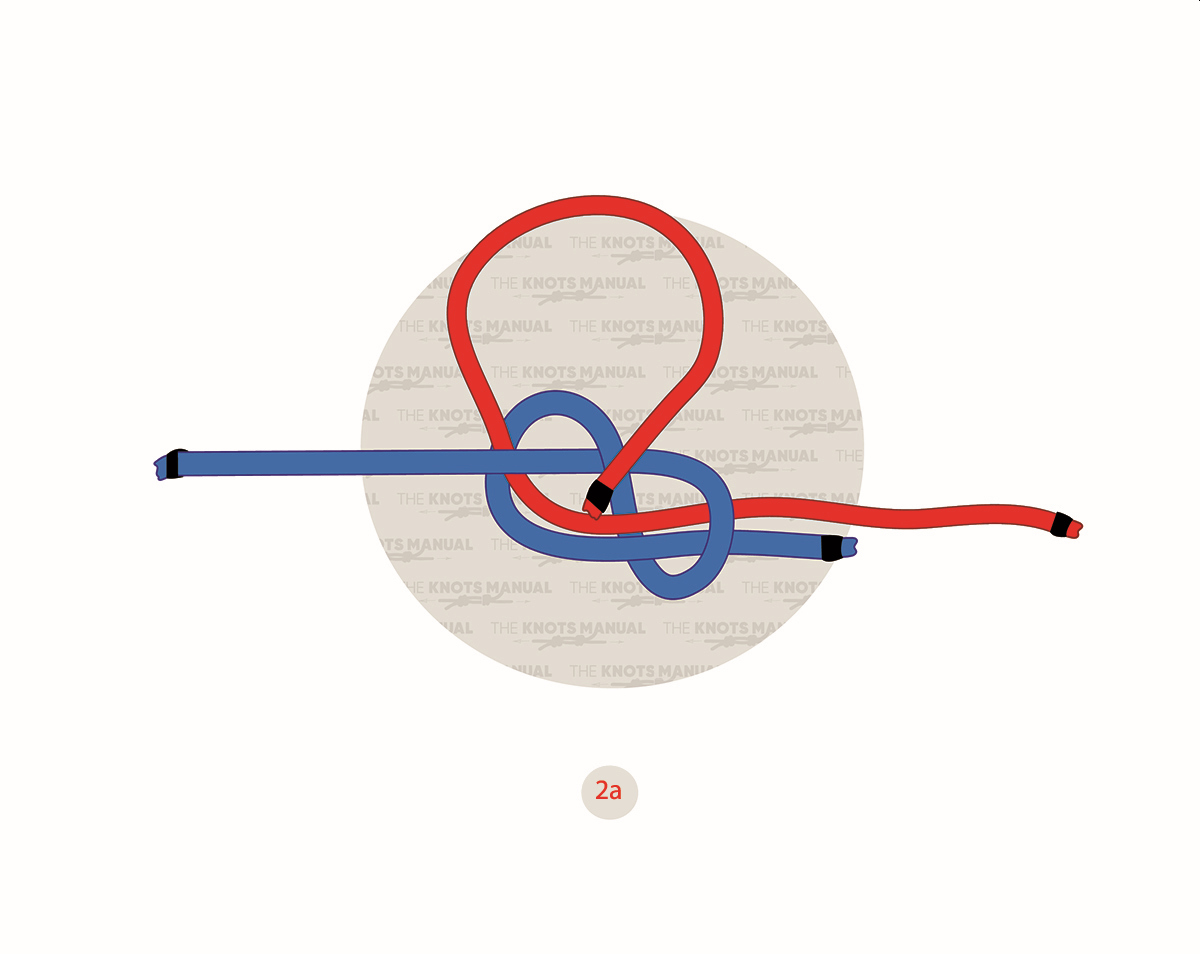
Continue retracing the knot, going under the rope.
Step 2b:
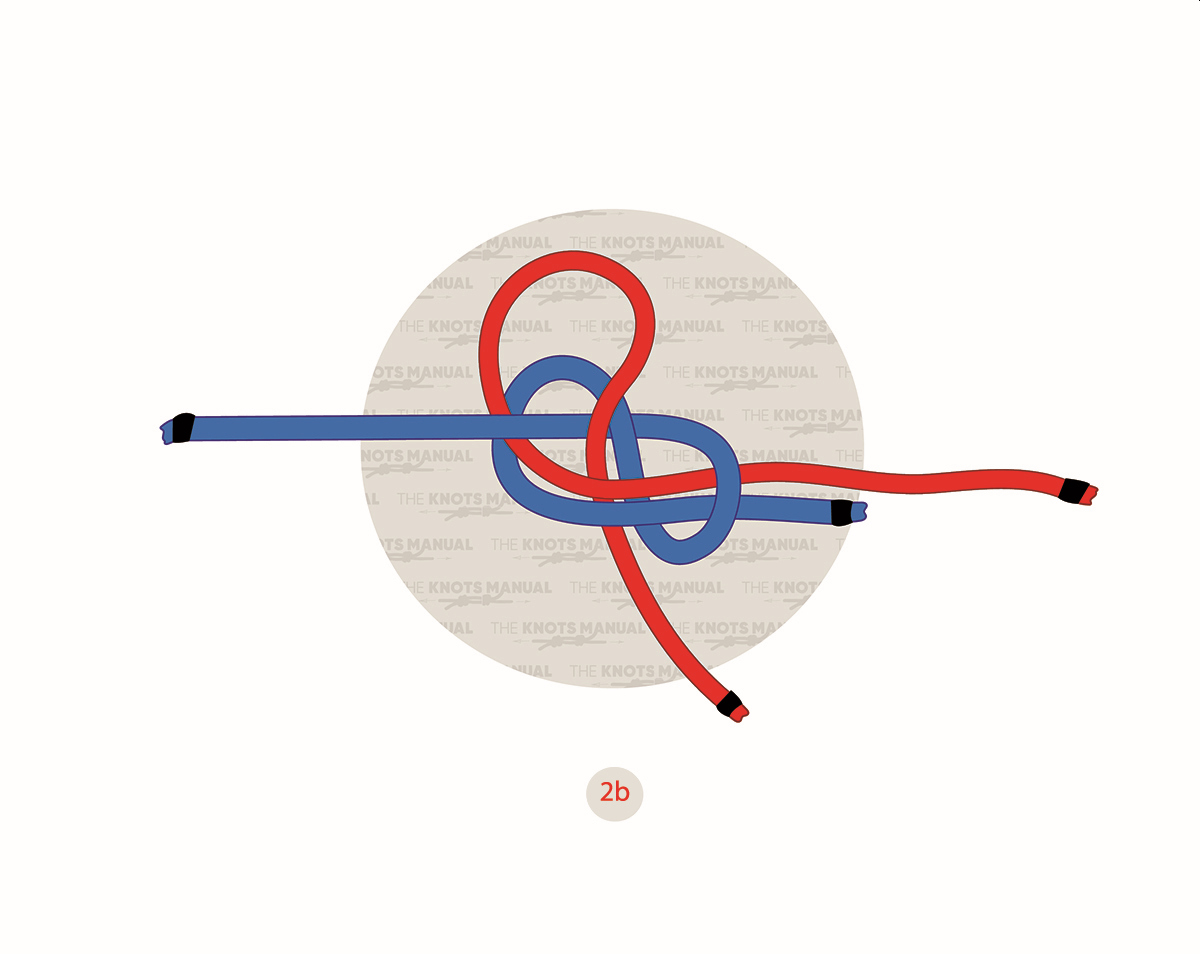
Continue retracing the knot, going over the rope.
Step 2c:
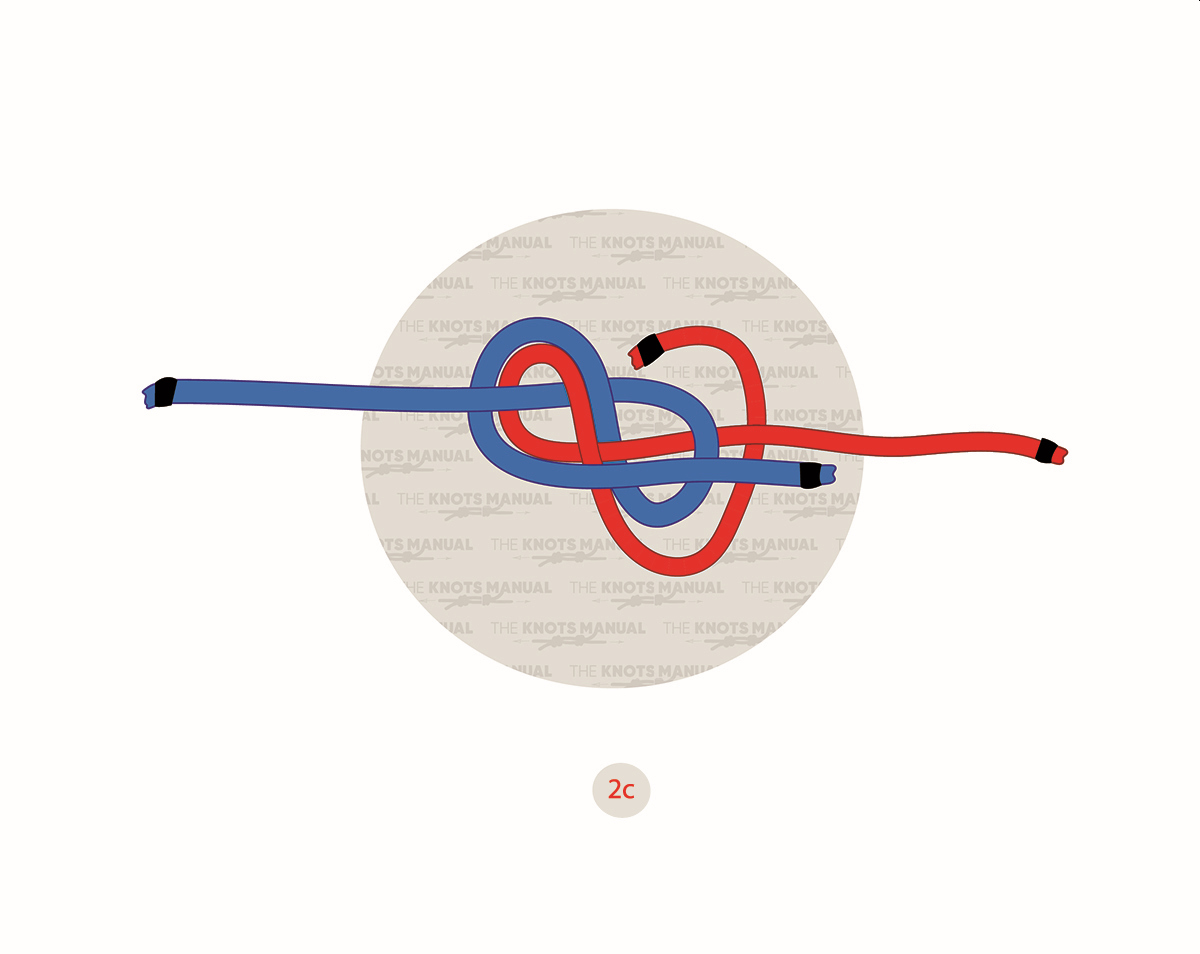
Continue retracing the knot, following the loop.
Step 2d:
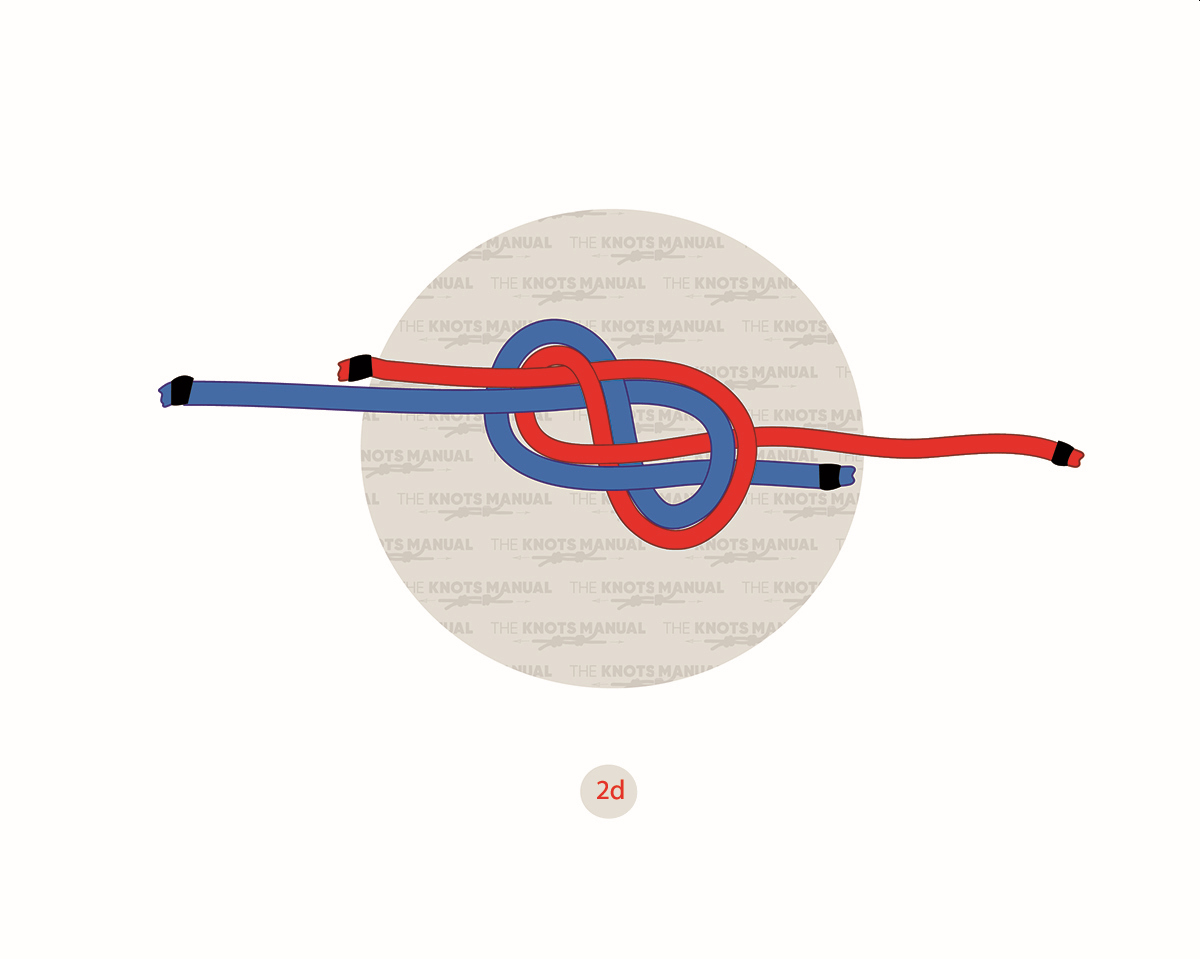
Finally, exit the end of the second rope through the final loop.
Step 3:
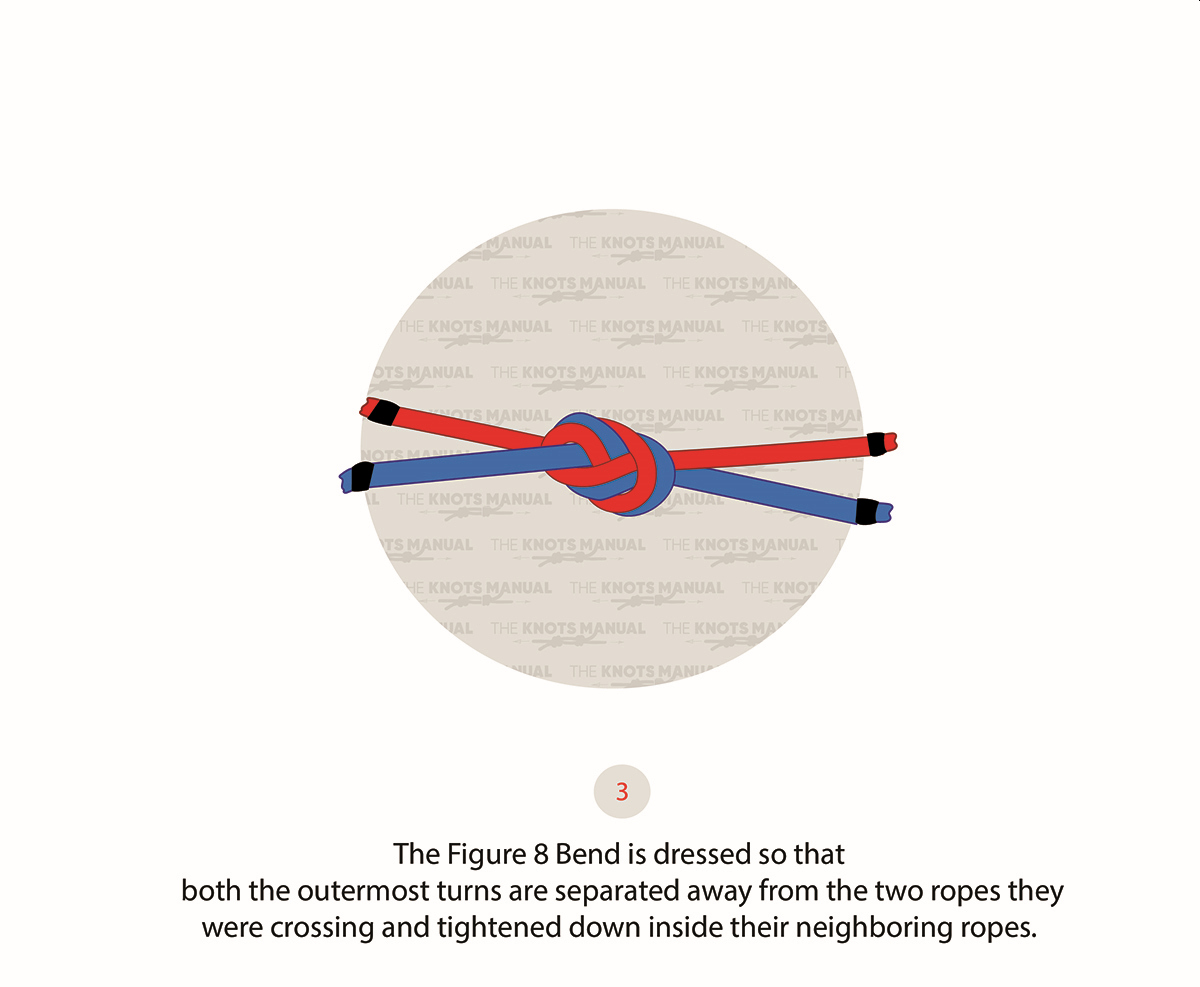
To tighten, pull the ropes in opposite directions.
Step 3a:
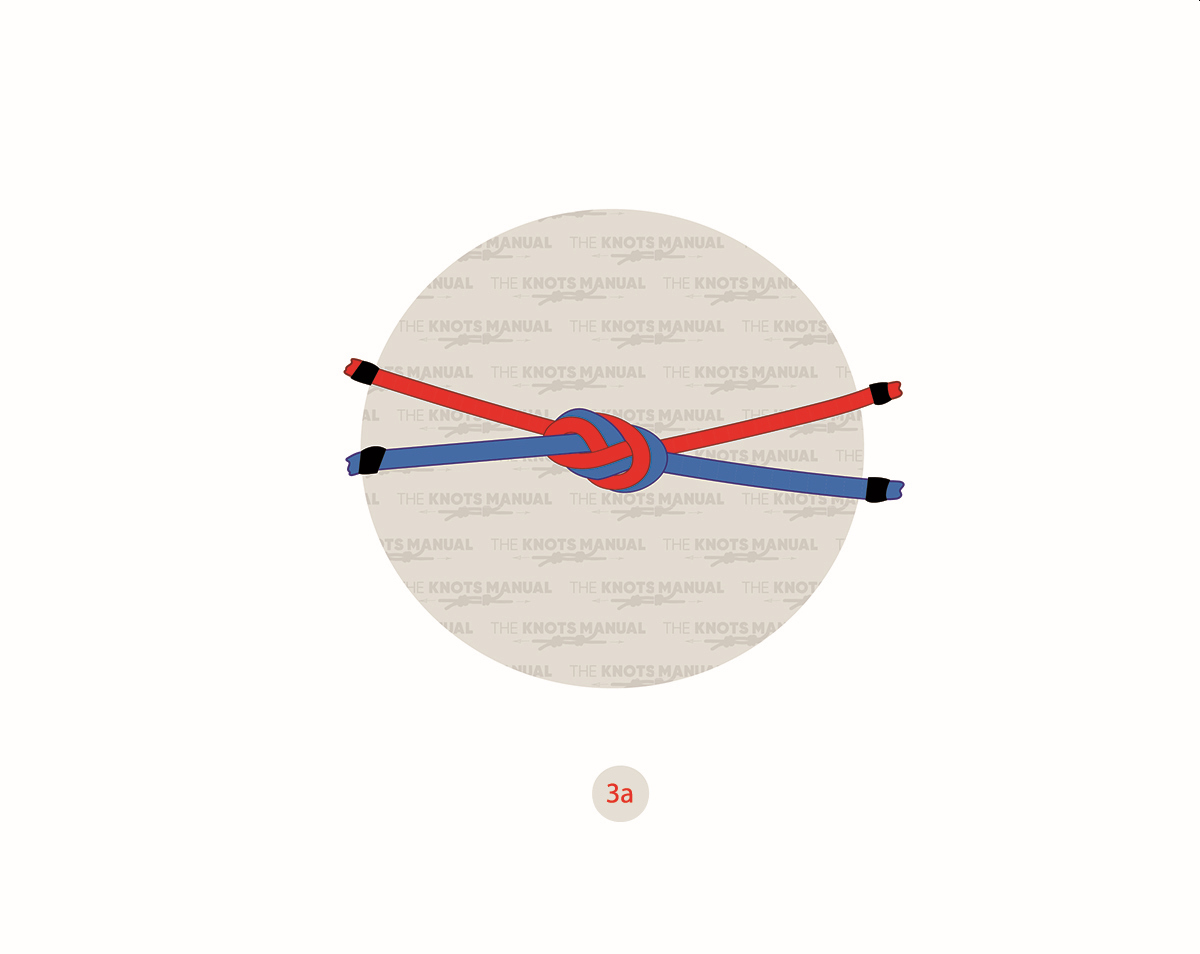
The final knot should form three sets of parallel ropes.
Frequently Asked Questions
How Strong Is the Figure 8 Bend Knot?
The Figure 8 Bend is a very strong knot, that can be used in critical situations, like climbing and rescue. That’s because it’s a contracting knot, that tightens when you put a load on it. It won’t slip unless the ropes are of different diameters.
What’s the Strongest Knot for Tieing Two Ropes Together?
Although the Figure 8 Bend is a very secure knot for tieing two ropes together, it’s not the strongest one. The strongest bend knots are considered to be the Double Fisherman’s Bend and the Nail Knots. But those are very hard to untie or hard to tie, which is why the Figure 8 Bend is more popular. The Figure 8 Bend is strong enough to be used for life-threatening situations.
Why Doesn’t My Figure 8 Bend Doesn’t Look Like the Flemish Bend?
Make sure that your Figure 8 Bend looks exactly like the pictures shown above. There is a dangerous variation of the Figure 8 Bend called “Flat Figure 8 Bend”, which can easily untie under load. This variation can be tied by retracing Figure 8 made with the first rope in the same direction as the first rope. This way, the two working ends of the rope end in the same direction but they should always be on the opposite sides. So always make sure to retrace Figure 8 in the opposite direction.