How to Tie an Albright (Special) Knot

The Albright Knot creates a very secure connection between two fishing lines (or ropes). It’s most commonly used to connect fishing braid to leader. It also works with lines of different materials and thicknesses.

This knot is also sometimes called the Regular Albright Knot, the Albright Special Knot, or the Special Albright Knot.

Quick Guide: How to Tie an Albright Knot

To tie an Albright Knot, create a bight near the end of the first line. Then pass the end of the other line through this bight and loop it around it once (step 1). Continue making another 8-10 turns with the second line (step 2). Finally, pass the end of the second line through the end of the bight (step 3).

When connecting fishing lines (or ropes) of different thicknesses, make a bight in the thicker/stronger line (blue line in step 1). Use the smaller/weaker line to wrap many turns around the thicker one, so that it grips better (red line in step 2).

Before tightening, make sure that the lines aren’t crossing each other and that the knot looks clean. If using a fishing line, drip it in water or saliva, so that it lubricates the knot. This will improve its strength.

To tighten the knot, grab both ends of each line in each of your hands and pull in the opposite directions (step 4). After that, release the working ends and again pull the main lines in opposite directions. Finally, cut off the ends (step 5).

Albright Knot Step by Step

Pros and Cons of the Albright Knot

The Albright Knot is so useful because it can be used to connect fishing lines of different diameters and materials. If one of the lines is less flexible and thicker than the other one, it doesn’t affect the strength of the knot.

It’s a very secure and reliable knot. It’s very unlikely to come loose if tied correctly.

Another benefit is that the Albright Knot is very easy to tie. This makes it very useful to teach to beginner fishermen. This also helps with difficult situations, for example, when tieing it in extreme cold.

It also has a very low profile. This allows it to easily slide through the guides without catching on anything.

The only downside to the Albright Knot is that it jams very badly. After loading, it’s almost impossible to untie. That’s why it’s only used with fishing lines, which can be cut off, instead of more expensive ropes.

Common Uses for the Albright Knot

Most commonly, the Albright Knot is used in fly fishing to attach a fly line to the leader. But it can also be used in other situations. For example, connecting backing to the fly line, attaching shock loaders to the main line, or attaching braid to the leader.

It can also be used when needing to connect two types of fishing lines. You can use the Albright Knot for connecting braid to mono, braid to fluorocarbon, mono to mono, wire to mono, mono to fluorocarbon, etc.

You can pretty much use it anytime you need to connect two different material fishing lines. The important thing to remember is to use the stronger and thicker line to make the loop (shown in step 1). The more-flexible line should be wrapped around the stronger one.

The Albright Knot can also be used for other applications outside of fishing. Although used rarely for this purpose, you make permanent connections between two ropes. It’s a very secure and easy-to-tie knot, which makes it ideal for this application. But you should remember that you won’t be able to untie it after use. For critical applications, you can also add Double Overhand Stopper Knots on each side for extra safety.

Modifications of the Albright Knot

Improved (Advanced) Albright Knot: A stronger version of the Albright Knot. It’s tied very similarly to the Albright Knot. But before tightening the knot, the end of the second line is wrapped 5 times through one side of the loop.

Alberto (Modified Albright) Knot: This is another variation of the Albright Knot which is stronger. It’s also used in similar applications, for example, when connecting monofilament to braid. The only difference to the regular Albright Knot is that the turns are overlapping one another. First, they’re tied in the direction away from the loop and then back over them. This creates extra friction and improves the strength of the knot. Often, this variation is taught as the Regular Albright Knot.

Yucatan (Reverse Albright) Knot: One of the strongest variations of the Albright Knot. It’s tied by making a bight in one line, then wrapping it around the other line many times, and then passing the end of the second line through the bight.

Double Albright Knot: The strongest variation of the Albright Knot. It’s tied identically, except each line is made into a bight first. This doubles each line, which greatly increases the strength of the knot.

Knots Like the Albright Knot

FG Knot: A more difficult, but much stronger knot compared to the Albright Knot. It’s used for similar applications – for attaching different material/diameter lines to the leader. It’s hard to learn, but once you learn it, it’s a valuable knot to know.

Nail Knot: A very easy knot used for similar applications to the Albright Knot. It’s similar in strength and similarly compact in design. Its only downside is that it requires a hollow straw for tieing the knot.

Double Uni Knot: A similarly-strong and easy knot used for tieing two fishing lines of different diameters and strengths. In its structure, it’s identical to the Double Fisherman’s Knot.

Blood Knot: A knot that’s used for connecting two finishing lines of similar diameters and materials. It’s easy to tie and reliable. Its only downside is that it doesn’t have as compact a design as the Albright Knot.

Bristol Knot: Used to attach shock leaders to doubled lines, like the Bimini Twist. It’s stronger than the Albrgith and Double Uni Knot but not as strong as the FG Knot. It can also be used when connecting lines of different diameters and materials.

Slim Beauty Knot: An easy and strong knot used to connect a braid to the leader. It’s a bit stronger than the Albright knot and similarly easy to tie.

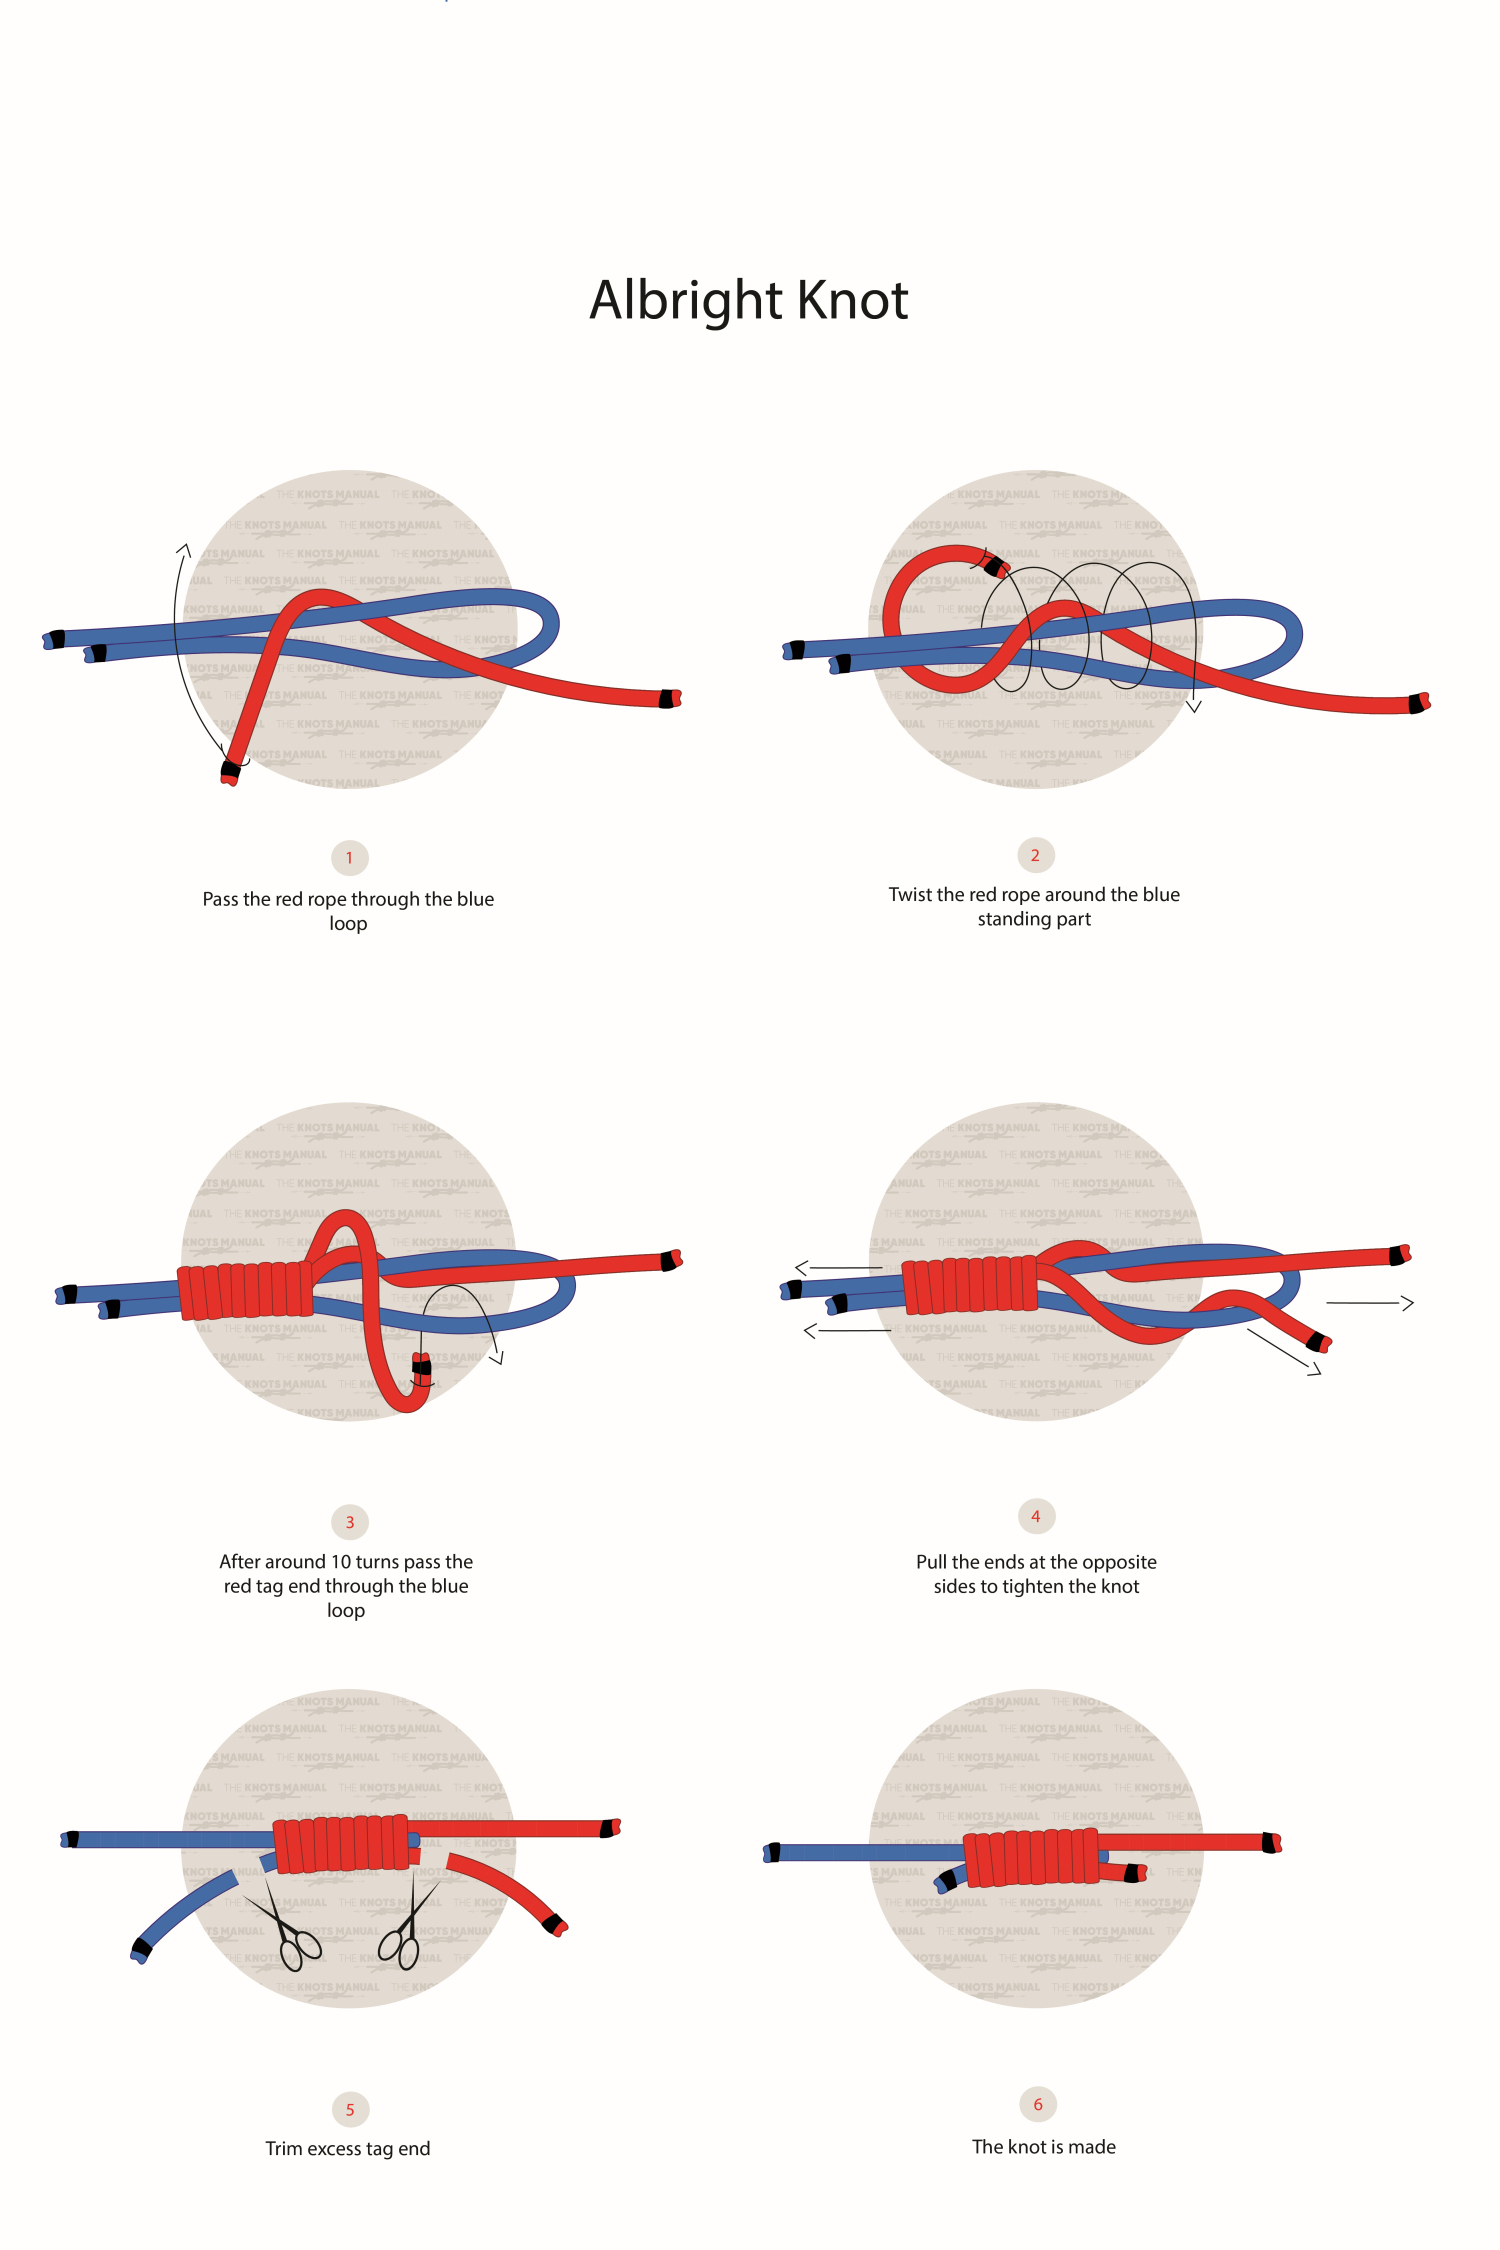
Illustrated Guide: How to Tie the Special Albright Knot

Albright Knot

A step-by-step guide on how to tie an Albright Knot.
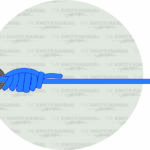
Step 1:

Albright Knot Step by Step 1

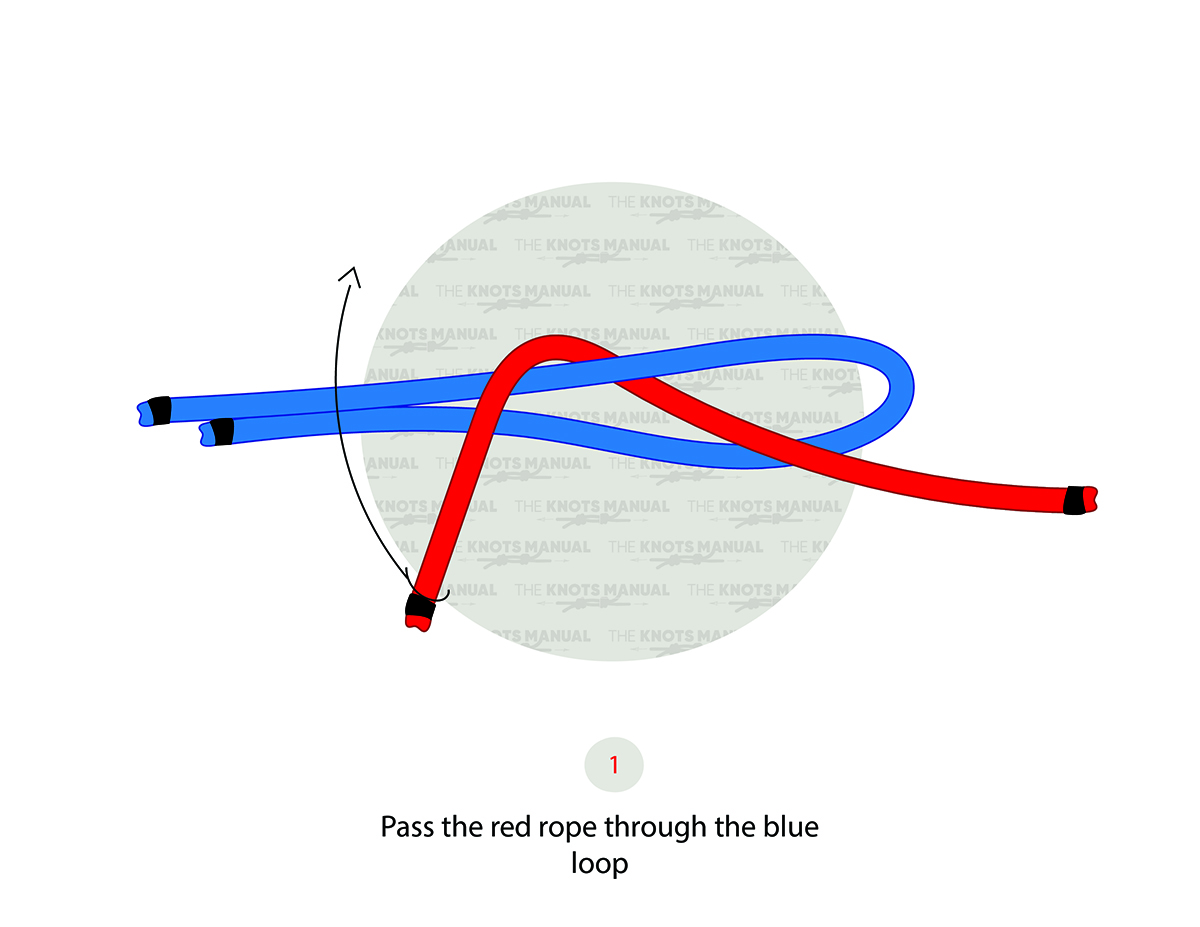
Create a bight at the end of the first (thicker) fishing line. Then pass the end of the second (thinner) line through and over it.

Step 2:

Albright Knot Step by Step 2

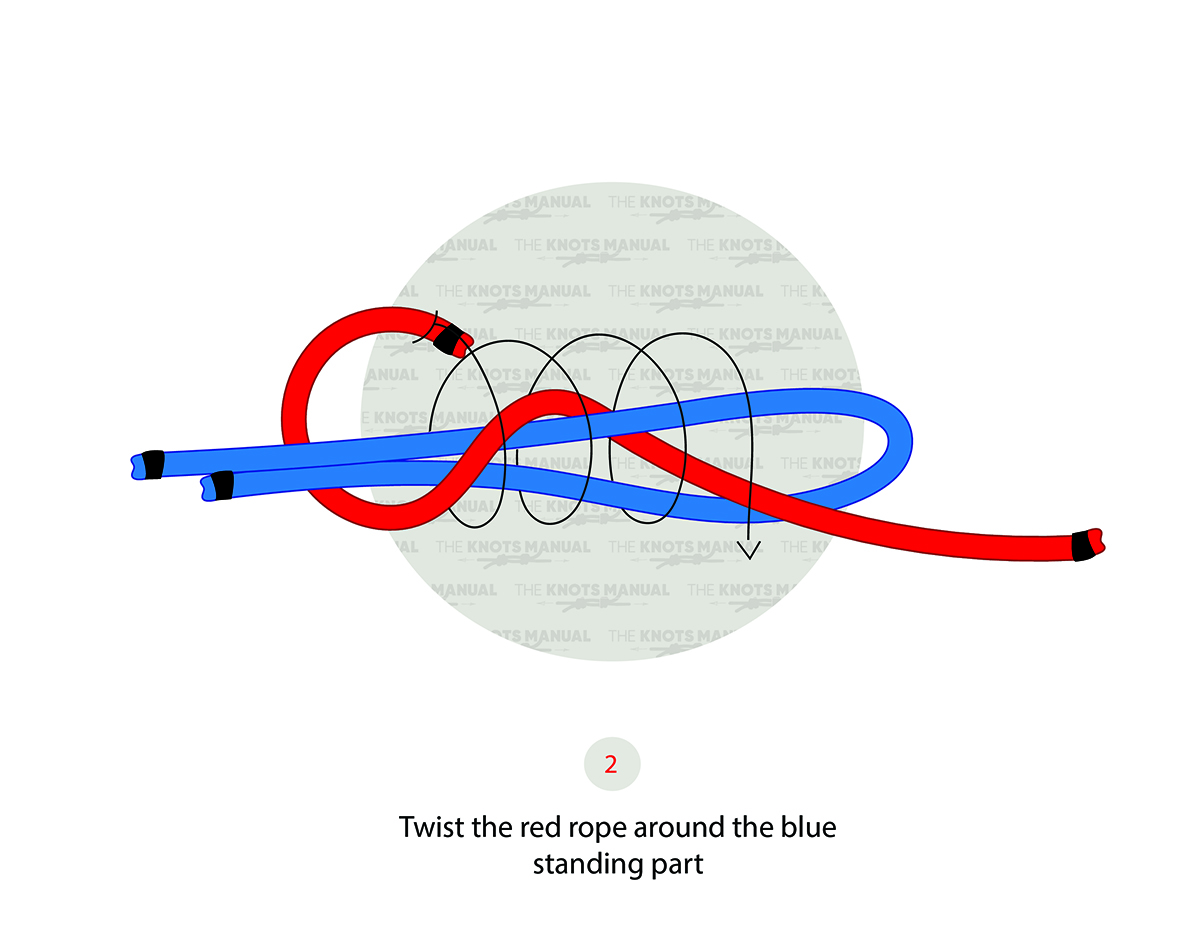
Make 8-10 turns with the second line around the bight created in the first line as shown in the illustration above.
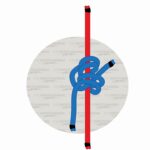
Step 3:

Albright Knot Step by Step 3

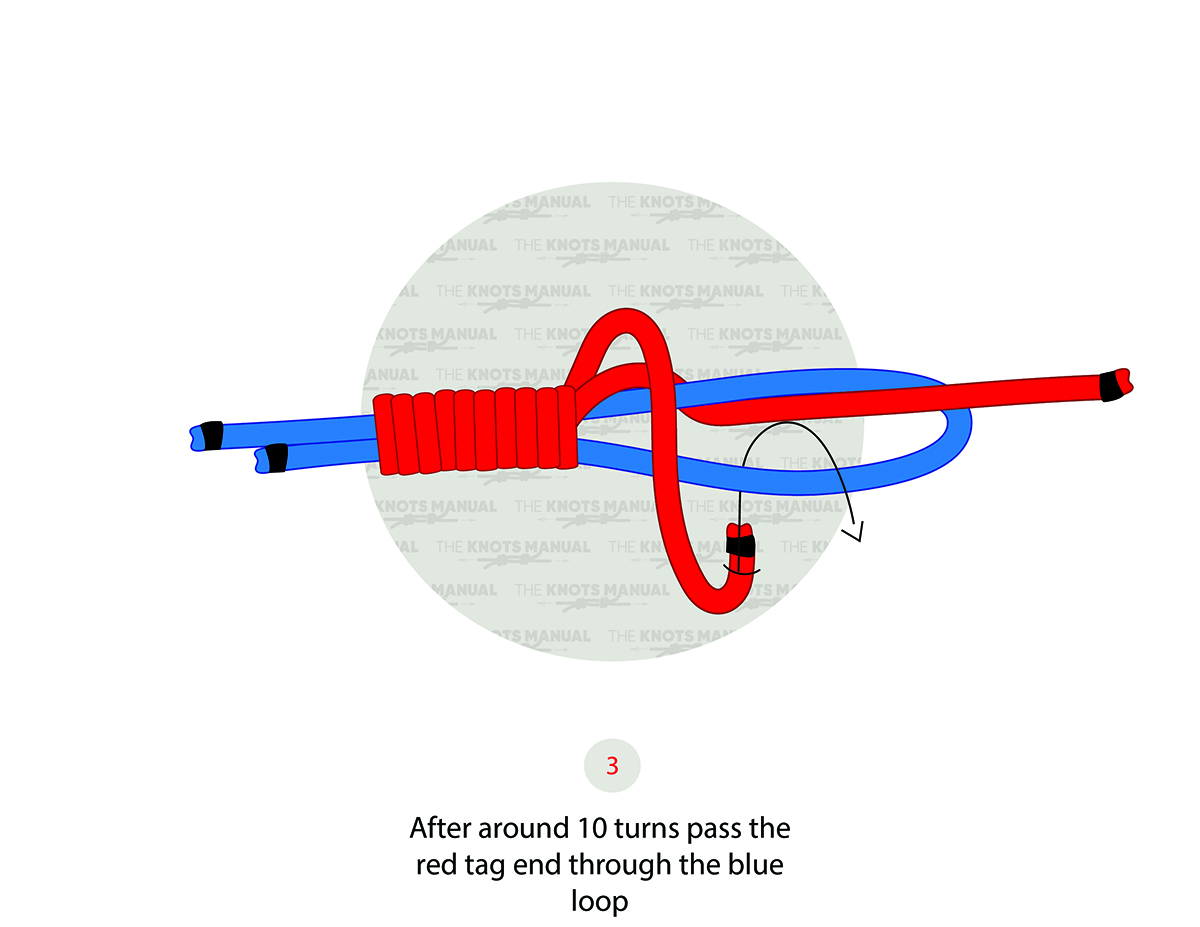
Tuck the end of the second line through the bight.
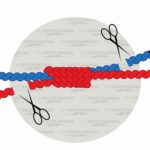
Step 4:

Albright Knot Step by Step 4

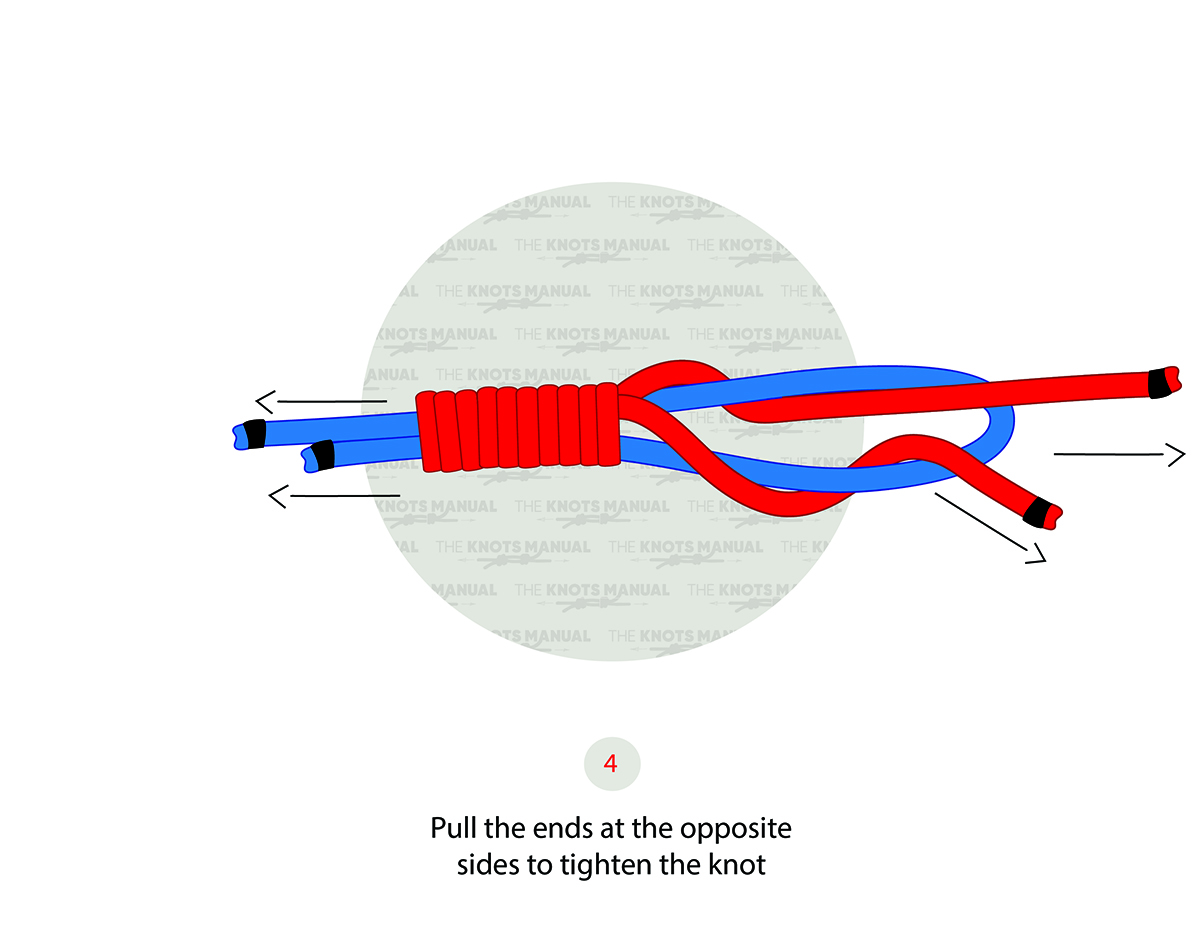
Pull both lines in opposite directions to tighten the knot.

Step 5:

Albright Knot Step by Step 5

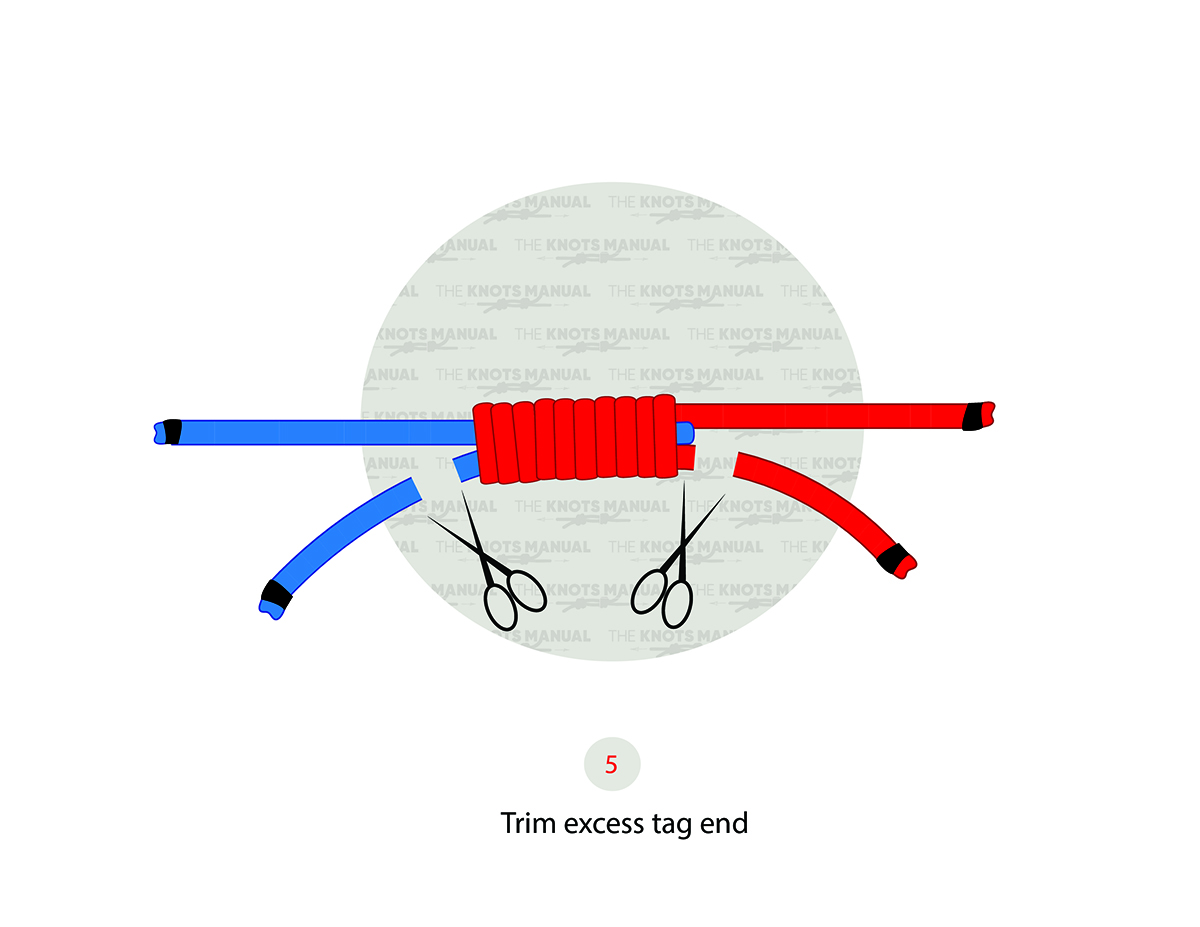
Cut off the excess ends to make the knot more compact.
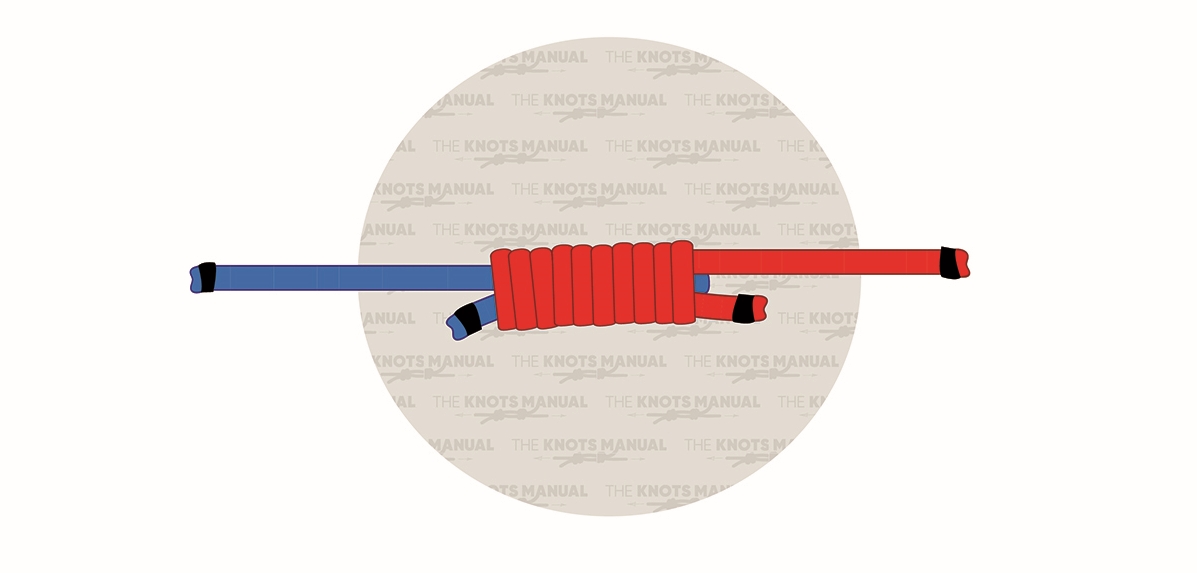
Step 6:

Albright Knot Step by Step 6

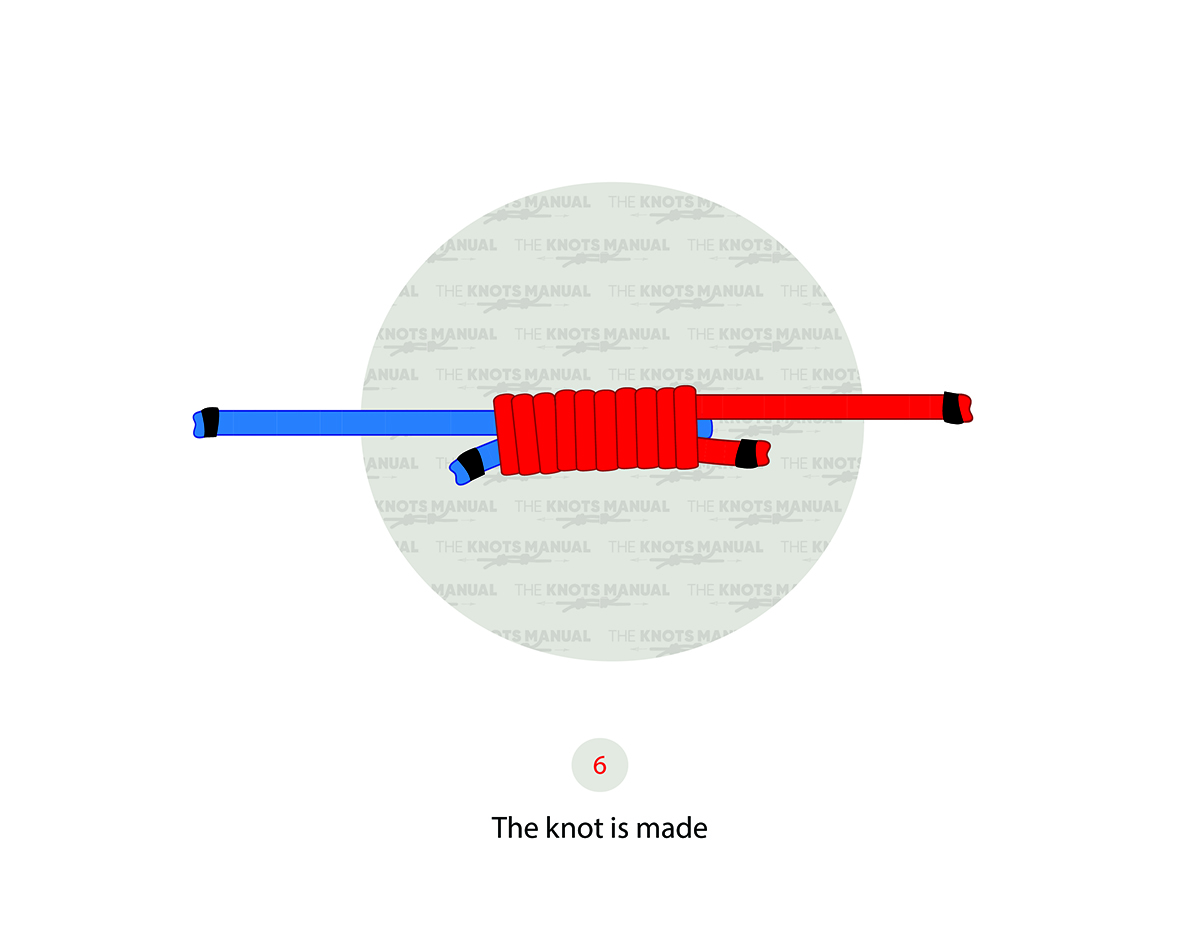
The finished knot is compact in design and very secure.


Frequently Asked Questions

Is the Albright Knot the Best for Connecting a Fly Line to the Leader?

The Albright Knot is reliable and strong enough to connect most types of fly lines to the leader. It can be used with fishing lines of different thicknesses and materials. Its ease of use and compact design makes it one of the most popular choices for this purpose.

But there are stronger alternatives to the Albright Knot. The Yucatan (Reverse) Albright Knot, Double Albright Knot, and FG Knot are all more reliable than the Special Albright Knot. So in extreme situations, these are better to use instead.

How Strong Is the Albright Knot?

The Albright Knot is a very strong knot used for connecting two fishing lines. It’s strong enough to be suitable for the vast majority of fishing situations.

Its strength can be increased even further by tieing more wraps around the loop. There are also many stronger variations of the Albright Knot, like the Yucatan Albright Knot, the Double Albright Knot, the Improved Albright Knot, and the Alberto Knot.

About the author
Oscar is a freelance writer who writes about traveling, hiking, and the outdoors. In his free time, he enjoys trekking in the mountains and camping in remote areas all across Europe.